Search or pick a section on the left to view details.
Find anything in the docs
search
Live search across titles and content. Highlights will show in results.
Getting Started with LinkMark
1
Published: January 27, 2026
Getting Started with LinkMark documentation! This chapter introduces the main idea behind LinkMark, the problem it solves, and how you can take your first steps using the app.
1 What is LinkMark?
Saving links feels easy, but finding them later can often be difficult and frustrating. LinkMark is designed to change that.
Unlike traditional bookmarks that disappear inside long lists, LinkMark keeps every link organized and accessible.
LinkMark ensures your saved links remain clear, organized, and easy to recognize over time.
2 What You Will Learn in This Chapter
In this chapter, we will guide you through the basics so you can make LinkMark your primary hub for managing links. You will learn how to:
Create Your Account: A quick guide to setting up your profile and using the app for the first time.
Add Your First Link: Step-by-step instructions on how to save and categorize your links.
Navigate the Main Screen: An overview of how LinkMark organizes and displays your saved content.
3 Common Questions for Beginners
At the end of this chapter, you will also find a dedicated section answering the most common first-time questions, helping you troubleshoot any initial roadblocks.
By the end of this guide, you will be fully ready to use LinkMark to save and manage your digital world with absolute clarity.
Was this article helpful?
Your feedback helps us improve the content.
Have questions?
Our dedicated team is here to help you understand the docs.
LinkMark is a dedicated place to save links with absolute clarity. It is a modern, smart link management application that helps you store web links in a way that makes sense when you return to them later.
Unlike traditional browser bookmarks that often become chaotic, each saved link in LinkMark stays clear, readable, and easy to recognize. Our main focus is on understanding links, not just storing them.
2 The Problem with Traditional Bookmarks
We all experience the same frustration: you find an interesting article, a useful tool, or a product you want to buy, and you save it to your browser bookmarks. A few weeks later, you open your bookmarks bar, only to find a long, confusing list of URLs. You cannot remember why you saved them, and clicking through each one wastes valuable time. LinkMark was designed to solve this exact problem.
3 How LinkMark Works: Beyond the URL
LinkMark saves links and keeps them meaningful using smart technology. When you add a link, LinkMark turns it into more than just a raw URL.
The app automatically captures the essence of the link and turns it into a clear visual item you can recognize at a glance.
This smart organization helps you quickly understand what the link is about without even needing to open it. It saves you time, reduces digital clutter, and boosts your productivity.
4 What LinkMark is Built For
LinkMark acts as a calm, structured space for your digital life. It is specifically built to:
Keep links organized: Move away from cluttered, messy folders and endless lists.
Keep information clear: See exactly what the link contains instantly through clean layouts.
Enhance Searchability: Find your saved ideas, articles, and resources with zero effort whenever you need them.
5 Who Can Benefit from LinkMark?
Whether you are a student doing research, a developer saving code snippets, a marketer collecting inspiration, or someone who simply loves organizing their digital space, LinkMark is built for you.
Important Note: LinkMark does not change how you browse the web. It simply gives your saved links a better, smarter, and more organized place to live.
Was this article helpful?
Your feedback helps us improve the content.
Have questions?
Our dedicated team is here to help you understand the docs.
Saving links is incredibly easy; however, remembering them later is not. Most people save links with the best intentions, thinking they have secured valuable information. Unfortunately, they rarely return to that content in a useful way.
The core problem LinkMark solves is bridging the gap between saving a link today and actually using it tomorrow.
2 How the Problem Starts
In our fast-paced digital world, links are saved quickly and impulsively. You might save content using various scattered methods:
A quick browser bookmark.
A quick screenshot on your phone.
A direct message sent to yourself on WhatsApp or Slack.
A note with a copied URL in your notes app.
At that exact moment, everything makes perfect sense. You know exactly why you saved it. But the real challenge begins when the moment passes.
3 What Happens Later: The Loss of Memory
As time passes, human memory fades. When you eventually return to your saved content after days or weeks, you are faced with a frustrating reality:
You do not remember why you saved the link.
You do not know what the link contains just by looking at the URL.
You do not even know where you saved it.
The link still exists, but its meaning is completely gone.
4 The Real Issue: Loss of Context
The fundamental problem is not the act of saving links. The real problem is losing the Context, Purpose, and Clarity behind the link. A raw URL without context becomes just another forgotten item in a messy digital closet.
5 Why This Matters for Productivity
This happens to millions of people every single day. Consequently, people end up wasting valuable time:
Searching again for the same content they already saved.
Opening the same links more than once to rediscover what they are.
Leaving highly useful information completely unused.
Ultimately, the initial effort to save the link is completely wasted.
Key Idea to Remember: Saved links should stay useful. Without proper context and clarity, saved links slowly turn into useless digital noise. LinkMark is designed to stop this from happening.
Was this article helpful?
Your feedback helps us improve the content.
Have questions?
Our dedicated team is here to help you understand the docs.
1 Overview: Short-term Storage vs. Long-term Value
Both LinkMark and traditional browser bookmarks are used to save links. However, the fundamental difference lies in how useful those links remain over time. While bookmarks are designed for quick, short-term storage, LinkMark is specifically designed for long-term understanding, clarity, and reuse.
2 What Traditional Bookmarks Are Good At
Bookmarks are simple and native to every browser. They work exceptionally well when:
You need quick access to a very small number of frequently used links.
You remember exactly what the link is without needing visual cues.
You do not need extra context or tags.
Basically, bookmarks store one thing only: the URL.
3 Where Bookmarks Start to Fail
As the number of your saved links grows, serious problems begin to appear. Traditional bookmarks do not explain why a link was saved, nor do they help you understand a link without opening it.
Over time, your bookmark lists inevitably become long, hard to scan, and easy to ignore. The link is technically saved, but its value slowly disappears.
4 What LinkMark is Built to Handle
LinkMark is built for modern users who save links regularly and need more than just a list. It focuses on:
Clarity instead of clutter: Visual and organized layouts.
Recognition instead of guessing: Rich previews that show what the link is about.
Return and reuse instead of forgetting: Smart sorting that brings old links back to life.
Consequently, each saved link stays readable and understandable, even weeks or months later.
5 Real Differences in Daily Use
To understand the difference, let’s look at how both perform in daily scenarios:
Feature
Traditional Bookmarks
LinkMark
The Core Action
Save now, remember later
Save now, understand later
Context
Depends on memory
Preserves context automatically
Layout
Long, flat text lists
Structured, scannable view
Preview
Requires opening the link
Clear before opening
Outcome
Easy to abandon
Easy to return to
6 What Changes for the User
With standard bookmarks, saved links often become archive clutter—a graveyard of unused ideas.
With LinkMark, saved links stay active and your information stays usable. You no longer waste time searching for that “one link” you saved months ago. LinkMark reduces repeated work and mental effort.
Key Idea to Remember: Bookmarks help you store links. LinkMark helps you keep links useful. That difference becomes increasingly important as your digital collection grows.
Was this article helpful?
Your feedback helps us improve the content.
Have questions?
Our dedicated team is here to help you understand the docs.
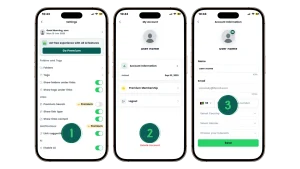
Creating your LinkMark account takes only a moment and keeps the process frictionless. You can create an account from any supported platform in just a few seconds. The signup process is identical across all devices, ensuring a smooth onboarding experience. Once you create your account, it works seamlessly across all platforms and gives you instant access to your saved links.
2 Where You Can Create Your Account
LinkMark is built for a multi-device world. Therefore, your account is not tied to a single device. You can sign up using any of the following platforms:
Android
iOS
macOS
Windows
Web Browser
Google Chrome Extension
3 Available Sign-in Options (No Passwords Needed)
To keep your data secure and save you from “password fatigue,” LinkMark supports simple, secure, and modern sign-in methods. You can choose to:
Continue with Google
Continue with Apple
Consequently, there is no need to create, remember, or reset a separate password. A trusted provider securely manages your authentication process.
4 Step-by-Step: How to Create Your Account
Getting started takes less than a minute. Just follow these simple steps:
Open LinkMark on any of your preferred supported platforms.
Choose your sign-in method by clicking either “Continue with Google” or “Continue with Apple”.
Authorize the login using your existing Google or Apple credentials.
That is it! LinkMark automatically creates and activates your account.
5 What Happens Next: Cloud Sync
After signing in for the first time, the real magic begins. Your new account immediately becomes available on all platforms. Furthermore, your data stays perfectly connected to your account through the cloud. You can save a link on your mobile phone while commuting, and it will be waiting for you on your desktop when you arrive at work.
Important Note: You only need to create your account once. After that initial setup, you can sign in anywhere on any device using the exact same method, and all your links will be synced instantly.
Sign in & Login Pages
Was this article helpful?
Your feedback helps us improve the content.
Have questions?
Our dedicated team is here to help you understand the docs.
Welcome to your very first moments with the app. The LinkMark first-time walkthrough is designed to be seamless, helpful, and platform-aware. We understand that you use a computer differently than you use a phone. Therefore, the onboarding experience actively adapts to the device you are holding.
LinkMark designs this experience intentionally to keep your first steps clear, fast, and intuitive, ensuring you understand the value of the tool before you even save your first link.
2 Platform-Specific Walkthroughs
Depending on where you start, your journey begins slightly differently:
3 On the Web App (Explore First)
When you open LinkMark on the web for the first time, we don’t block you immediately. The app takes you directly to the homepage interface. You can explore the layout, click on menus, and understand the design language freely.
The Trigger: As soon as you try to take a meaningful action—such as adding your first link or creating a folder—LinkMark gently prompts you to sign in. You can then authenticate securely using Google or Apple to save your work.
4 On the Browser Extension (Action First)
The browser extension is a tool for speed and efficiency. Consequently, when you open the extension for the first time, LinkMark asks you to sign in immediately.
The Reason: The extension needs to connect to your cloud database instantly to save links. Without signing in, it cannot perform its primary function.
5 On Mobile & Desktop Apps (Visual Onboarding)
On both Android/iOS and the Mac Desktop app, the LinkMark first-time walkthrough starts with a visual story.
The Flow: You will see a short series of beautiful onboarding screens. These slides highlight the core benefits: “Save Fast,” “Organize with AI,” and “Sync Everywhere.”
The Action: After this brief overview, the app prompts you to sign in. This ensures your mobile or desktop environment is ready to sync data the moment you start using it.
6 Why Sign-In Is Required?
You might wonder why an account is necessary so early. Across all platforms, signing in allows you to:
Sync Data: Ensure every link you save on your phone appears instantly on your laptop.
Secure Privacy: Keep your personal reading list private and protected.
Unlock Features: Access advanced AI organization and folder management immediately.
This step exists entirely for your benefit. Signing in acts as the key that unlocks your private, secure digital workspace.
Key Idea to Remember: The LinkMark first-time walkthrough centers around your account. It is the bridge that connects all your devices, ensuring your content is safe, backed up, and accessible wherever you go.
main guest home page
Was this article helpful?
Your feedback helps us improve the content.
Have questions?
Our dedicated team is here to help you understand the docs.
Adding your first link in LinkMark is a quick, simple, yet powerful process. While browser extensions allow for one-click saving, adding a link manually inside the app gives you full control. The app walks you through each step and shows you exactly what the final card will look like before you confirm. This ensures that every link you save includes clear context, accurate metadata, and stays easy to find later.
2 Step-by-Step Guide
Follow these six simple steps to transform a raw URL into a rich information card:
3 Step 1: Open the Panel
From the main dashboard screen, locate and click the prominent “Add Link” button. A dedicated panel will slide open immediately, asking for the web address you wish to save.
4 Step 2: Paste and Search
Paste the URL you copied from your browser into the input field and click “Search”.
Behind the Scenes: LinkMark doesn’t just save text; it sends a scout to that webpage to fetch the title, description, and image automatically.
5 Step 3: Review the Preview
Within moments, the app displays a rich Link Preview. This allows you to verify:
The official page title.
A short captured description.
A preview image or website icon. This step prevents you from accidentally saving broken links or the wrong page.
6 Step 4: Enhance with AI (Optional)
Here is where LinkMark shines. You can refine the description to add personal context. If the original text is messy, use the “Rewrite with AI” button to instantly turn long, complex text into a concise, readable summary.
7 Step 5: Organize Instantly (Optional)
Save time later by organizing now. Before hitting save, you can:
Select a Folder: Drop the link directly into categories like “Work,” “Recipes,” or “Design.”
Add Tags: Attach keywords for faster searching. These steps remain optional, but they help keep your workspace structured from day one.
8 Step 6: Save the Link
When everything looks perfect, click “Add Link”. The panel closes, and your new link instantly appears in your list as a clean, structured visual card.
9 What Happens After Saving?
Once saved, the link is immediately indexed in your main view. It is now searchable, editable, and synced across all your devices. You have successfully turned a fleeting web address into a permanent piece of your personal knowledge base.
Key Idea to Remember: Saving a link takes seconds. Adding context makes it valuable long-term. LinkMark helps you do both effortlessly from the very first link.
Add your first link
Was this article helpful?
Your feedback helps us improve the content.
Have questions?
Our dedicated team is here to help you understand the docs.
The LinkMark main screen is where all your saved links live. It is the central hub of your digital world. The interface is specifically designed to be clean, calm, and easy to scan. Everything you need is immediately visible without having to dig through hidden menus or complex settings.
2 Top Navigation Tabs
At the very top of the screen, you will find the main navigation tabs that divide your content into three logical spaces:
Home: This is your primary feed. It shows all your active saved links in one place.
Favorite: Displays only the links you marked as highly important, giving you instant access to your best resources.
Archive: Keeps links you do not need right now but do not want to delete permanently. It is the perfect place for completed reading or finished projects.
3 The “Add Link” Button
The Add Link button is always visible at the top of the interface. This is the main action in LinkMark. You will use it whenever you want to save a new web page, article, or resource to your collection.
4 Categories and Smart Filters
Directly below the navigation, you will see category filters such as Social Media, Sport, News, Maps, and Website. These filters help you quickly narrow down your links by type. Furthermore, each category label displays a counter showing exactly how many links it contains, giving you a quick overview of your collection.
5 Powerful Search and View Options
6 The Search Bar
The search bar lets you find any saved link in a fraction of a second. You can search by title, keyword, or tag to instantly narrow down large link collections. Next to the search bar, you may also see quick filtering options to refine your results even further.
7 Flexible View Options
On the right side of the screen, you can change how your links are displayed. These options let you switch between different layouts (like Grid or List view), depending on what feels clearer and more comfortable for your eyes.
8 Link Cards: Context at a Glance
Instead of text-heavy lists, each saved link appears as a visual “Card.” A standard card usually shows:
The link title.
A short, readable description.
A preview image or website icon.
The category label.
This rich layout helps you recognize the link instantly without opening it.
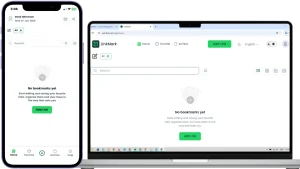
9 The Empty State
If no links are saved yet, the screen shows a friendly message inviting you to add your first link. This keeps the interface simple and uncluttered until you start adding your own content.
Key Idea to Remember: The LinkMark main screen is your personal link workspace. It is built to help you see everything clearly, find links quickly, and stay organized without any mental effort.
LinkMark main screen
Was this article helpful?
Your feedback helps us improve the content.
Have questions?
Our dedicated team is here to help you understand the docs.
Starting with a new tool can sometimes bring up a few questions. In this section, we have gathered the most common first-time questions asked by new LinkMark users. These answers help you start confidently and get the most value from your new link management space.
2 Do I need to sign in to save links?
Yes. You need to sign in to your account to save and keep your links. This step securely stores your data in the cloud and makes it available across all your devices.
3 Why is signing in needed to use LinkMark?
Signing in is a fundamental requirement because it allows LinkMark to provide you with advanced features. Specifically, it enables LinkMark to:
Save your links permanently so you never lose them.
Sync your data instantly across all platforms.
Keep your content secure and private to your account. Without signing in, your valuable links cannot be stored or synchronized.
4 Can I use the same account on all devices?
Absolutely. Your LinkMark account works seamlessly across the Web, Mobile apps (iOS and Android), Desktop apps (Windows and Mac), and the Browser Extension. Once you are signed in, your links are always available to you, no matter which device you are using.
5 Can I edit a link after saving it?
Yes, you have full control. After saving a link, you can easily update its details at any time. You can change the title, rewrite the description, move it to a different folder, or modify the tags. Any changes you make are saved instantly.
6 Can LinkMark replace browser bookmarks?
Yes, it can fully replace them. In fact, LinkMark provides a much clearer and more organized way to save and manage links compared to traditional browsers. Many users choose LinkMark as their primary space for saving important content because it preserves context, unlike standard bookmark lists.
7 What is the best way to start using LinkMark?
The best approach is to start simple. Do not worry about creating a complex folder system on day one. Just save your links first. You can organize them gradually into folders and tags later as your collection grows naturally.
8 Where can I find more help?
Additional help, tutorials, and step-by-step guides are always available inside the app’s Help Center and throughout this documentation.
Key Idea to Remember: To keep your links safe, organized, and accessible from anywhere, always sign in and use LinkMark as your main, trusted bookmark space.
Was this article helpful?
Your feedback helps us improve the content.
Have questions?
Our dedicated team is here to help you understand the docs.
Welcome to Chapter 2 of the LinkMark documentation! This chapter explains how you can seamlessly add and discover new content inside your workspace.
Saving links should never feel like a chore. Therefore, this section shows the different, flexible ways links can enter your workspace, and how each method fits a real-life situation without breaking your workflow.
2 Flexible Ways to Add Links
In the upcoming sections, you will learn how to capture information at the exact moment you find it. We will cover:
Manual Addition: How to add links manually when you already have a specific URL copied to your clipboard.
Saving While Browsing: How to save links directly from your web browser, mobile apps, or the dedicated browser extension with just a single click.
Each method is designed to help you save content at the right moment without interrupting your focus.
3 Discovering Content: Integrated Web Search
This chapter also introduces one of LinkMark’s most powerful features: searching the web directly inside the app.
Usually, people search in one tool (like a browser) and save in another. LinkMark changes this by keeping both actions connected. You will see how search and saving work together in one unified place. You will learn how to:
Search the web without leaving LinkMark.
Review search results instantly.
Choose what matters most and save the best results as regular links.
4 Consistent Structure for All Links
The chapter also explains how saved search results behave exactly like any other link. It is important to know that LinkMark keeps your content highly consistent.
No matter how you added the link—whether through the mobile app, extension, or internal search—once saved, all links follow the exact same clear structure. Every link stays readable, beautifully organized, and ready to use later. The method of adding may change, but the clear result stays the same.
5 What You Will Achieve
By the end of this chapter, you will know how to add content to LinkMark confidently. Furthermore, you will also know how to actively discover new content and turn raw web data into useful, structured links inside your personal LinkMark space.
Was this article helpful?
Your feedback helps us improve the content.
Have questions?
Our dedicated team is here to help you understand the docs.
LinkMark gives you more than one way to add content. It understands that you discover information in different places and at different times. Therefore, you can save links directly, capture them from various platforms, or actively discover new content through search.
Regardless of the method you choose, all paths lead to the exact same result: a clear, structured, and usable link inside your workspace.
2 Three Main Ways to Add Content
Content can enter your LinkMark space through three distinct, simple ways. Each method is designed for a different moment in your workflow, but they all work together seamlessly.
3 Manual Adding
You add a link yourself by copying a URL and pasting it directly into LinkMark. This is the most traditional way of saving content and gives you full control over the process.
4 Platform-Based Adding
You save links instantly while using the web app, mobile app, or browser extension. This integration allows you to save content right where you are, without switching tabs or interrupting your reading.
5 Search-Based Adding
You search the web from inside LinkMark and save the best results directly as links. This powerful feature eliminates the need to use a separate search engine.
6 Scenarios: When to Use Each Method
To get the most out of LinkMark, it helps to know when to use each method:
Use manual adding when you already have a specific link. For example, a colleague sends you a useful article via email or Slack, and you want to save it quickly.
Use platform-based adding when you are actively browsing the web or using another app, and you stumble upon something worth saving for later.
Use search-based adding when you want to discover new content or research a topic without leaving the LinkMark environment.
7 One Shared Outcome: Total Consistency
No matter how you add content to the app, LinkMark ensures a unified experience. Every time you save something:
Links are saved in a highly consistent, visual format.
Information stays perfectly readable and clean.
Content is always ready to be organized and tagged later.
Key Idea to Remember: How you add content can change depending on your situation. However, how your content is saved and displayed stays beautifully consistent every single time.
Was this article helpful?
Your feedback helps us improve the content.
Have questions?
Our dedicated team is here to help you understand the docs.
Adding a link manually is the most direct and traditional way to save content in LinkMark. You simply paste a link, review its details, and then save it to your workspace. You don’t need any extra steps or complex configurations. This method gives you complete control over what enters your library.
2 Step-by-Step Guide to Manual Adding
3 Step 1: Open the Add Link Window
From the main screen of the application, locate and click the “Add Link” button. Immediately, a dedicated window will open, asking you to enter a web link or perform a search.
4 Step 2: Enter the Link
Paste the exact link you want to save into the input field. LinkMark accepts a wide variety of formats. This can be:
A standard website link.
A specific news article or blog post.
A video from YouTube or other streaming platforms.
Any valid public URL. Once pasted, click the “Search” button to continue the process.
5 Step 3: Review the Link Preview
LinkMark automatically analyzes the link in the background and generates a rich preview. This visual preview helps you confirm that:
The correct page was successfully detected.
The extracted title and description make sense. At this stage, you can quickly decide if the link is actually worth saving before it clutters your workspace.
6 Step 4: Adjust Link Details (Optional)
Before finalizing the save, you have the opportunity to customize the content. You can:
Edit the title to something more recognizable.
Improve the description manually.
Use the “Rewrite with AI” feature to automatically generate a clearer, more concise summary. These small changes significantly help you recognize the link later.
7 Step 5: Save the Link
When everything looks perfectly right, click the “Add Link” confirmation button. The link is now successfully saved and instantly appears as a clean visual card on your main screen.
8 What This Method is Best For
Manual adding is highly recommended and ideal when:
You already have a specific link copied to your clipboard.
You want absolute full control over the link details and organization.
You are receiving content from outside LinkMark, such as an email, a messaging app, or a document.
Key Idea to Remember: Manual adding gives you total control. You choose the link, review it, and save it with absolute clarity from the very start.
Add a link manually
Was this article helpful?
Your feedback helps us improve the content.
Have questions?
Our dedicated team is here to help you understand the docs.
Social media platforms are full of valuable content. People share educational articles, tutorial videos, insightful posts, and long threads every day. However, social media feeds move incredibly fast. If you do not save a post immediately, it is often lost forever.
LinkMark helps you save this valuable content in a clear and usable way, allowing you to separate useful information from the daily “social noise.”
2 Method 1: Copy and Add the Link
The first method is the most universal and works on absolutely any platform, whether you are on mobile or desktop. You simply copy the link from the social media app, then add it to LinkMark using the manual method explained in the previous section.
This approach is highly useful when:
You are already copying the link to send it to a friend.
You are using a desktop browser where direct sharing is not available.
The specific social platform does not support standard sharing directly to other apps.
3 Method 2: Share Directly to LinkMark (Mobile)
The faster, more seamless method is using the native “Share” option on your mobile device (iOS or Android). This allows you to save content without leaving the social app.
From the social media app (e.g., X/Twitter, Instagram, LinkedIn):
Tap the Share icon on the post.
Choose More or Other options to open the system share sheet.
Select the LinkMark app icon from the list.
Consequently, the link is sent directly to LinkMark and is immediately ready to be saved to your workspace.
4 Supported Social Content
You can save almost anything from the social web. LinkMark successfully supports links from:
Long-form social posts and threads (e.g., X/Twitter or Reddit).
Short-form and long-form videos (e.g., TikTok, Instagram Reels, YouTube).
Professional articles and updates (e.g., LinkedIn).
Public user profiles and company pages.
Essentially, as long as the content has a public URL, it can be saved and organized.
5 Why This Works Well
Social links saved directly inside apps (like Instagram Saved or Twitter Bookmarks) are easy to forget and hard to search. By saving them in LinkMark instead, you:
Keep the content clear and out of the algorithm.
Make it much easier to return to and search for later.
Separate genuinely useful content from endless entertainment.
Key Idea to Remember: Social media moves fast. LinkMark helps you freeze time and keep the parts that truly matter to you.
Was this article helpful?
Your feedback helps us improve the content.
Have questions?
Our dedicated team is here to help you understand the docs.
You can add links using LinkMark directly from inside the platform without ever needing to leave your workspace. This method provides a highly focused environment for managing your digital collection.
The core process works identically on the web and mobile apps, ensuring a familiar experience. However, there are also extra, powerful options available exclusively through the browser extension.
2 Adding Links Using the Web and Mobile App
The web dashboard and mobile apps share the exact same intuitive flow. When you are already inside the application, you can easily add content.
From inside LinkMark, follow these steps:
Tap or click the “Add Link” button.
Paste a URL or enter a search term directly into the input field.
Review the automatically detected content and generated preview.
Click “Save” to add the link to your collection.
3 Why Use This Method?
This manual, in-app method is absolutely ideal when:
You are already using LinkMark to organize your workspace.
You want to add multiple links quickly in one sitting (batch saving).
You prefer to thoroughly review and tag content before saving it.
4 Adding Links Using the Browser Extension
The LinkMark browser extension offers the fastest, most frictionless way to save links while you are actively browsing the internet. It acts as your personal assistant on the web.
With the extension installed, you can add links effortlessly by:
Saving the current page directly with a single click on the extension icon.
Using the right-click menu (Context menu) and selecting “Save page to LinkMark.”
Adding a page instantly without needing to copy or paste the URL at all.
These options are specifically designed to save you time and drastically reduce interruptions while you are in your browsing flow.
5 When to Use Each Option
Choosing the right method depends entirely on your current task:
Use the web or mobile app when you want a focused, controlled saving experience where you take time to organize content.
Use the browser extension when you want to capture content instantly on the fly while doing heavy research or casual browsing.
Key Idea to Remember: LinkMark adapts perfectly to how you browse. Whether you add links from strictly inside the app or capture them instantly while browsing the web, your content is always saved in the same clear, consistent format.
Add links using LinkMark
Was this article helpful?
Your feedback helps us improve the content.
Have questions?
Our dedicated team is here to help you understand the docs.
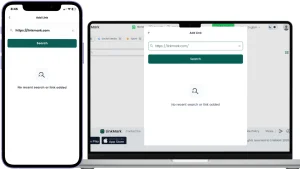
LinkMark is more than just a place to store existing links; it includes a powerful, built-in web search experience. This feature allows you to actively search for content, review results, and decide what to keep—all without ever leaving the platform. It creates a seamless bridge between discovering information and saving it.
2 The Smart Input Field: Where Search Happens
Web search is easily accessible directly from the Add Link screen. The input field is smart and handles two actions simultaneously. You can start a search by:
Typing a search query: For example, typing a topic like “best productivity tools” or a company name.
Entering a full URL: If you already know the website address.
You do not need to choose a specific mode; the same input field understands your intent automatically.
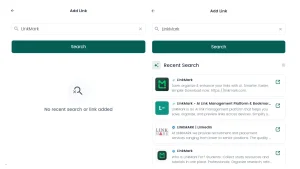
3 Running a Search and Reviewing Results
After entering your search term, simply click “Search”. Instead of opening a new browser tab, LinkMark instantly shows a list of live web results directly inside the same screen. This keeps your mental flow focused and completely uninterrupted.
4 Understanding Search Results (Visual Context)
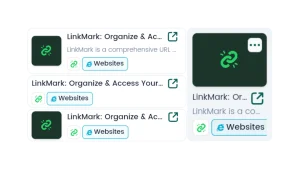
Unlike traditional text-heavy search engines, each result in LinkMark is displayed as a rich preview card. A standard search result usually includes:
The official website or page name.
A short, readable description of the content.
A visual icon, logo, or preview image.
A direct link to the original source.
Consequently, this rich visual context helps you understand the content immediately before you even open it.
5 Accessing Recent Searches
To save you time, LinkMark keeps a short list of your Recent Searches. This convenient feature allows you to revisit previous searches quickly and continue your content discovery exactly where you left off, without starting over from scratch.
6 Why Search Inside LinkMark? (The Workflow Advantage)
Traditional web search separates discovery from saving. Usually, you open Google, open ten different tabs, and eventually forget to save the most important ones. In contrast, LinkMark brings them together in one calm space:
You search for new ideas.
You review visual results.
You decide what is worth keeping and save it instantly.
Key Idea to Remember: Web search inside LinkMark is not just about finding random pages. It is designed to help you discover genuinely useful content and prepare it for saving—calmly, clearly, and all in one place.
Web search inside LinkMark
Was this article helpful?
Your feedback helps us improve the content.
Have questions?
Our dedicated team is here to help you understand the docs.
After successfully searching the web inside LinkMark, you have the powerful ability to turn any valuable search result directly into a saved link. This feature allows you to move seamlessly from initial discovery to long-term saving, completely eliminating the need to leave the platform or switch browser tabs.
2 Step-by-Step: Turning Results into Links
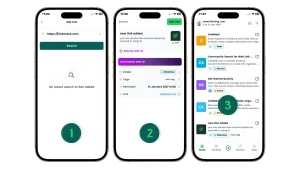
3 Selecting a Search Result
From the generated search results list, simply browse through the options and choose the result you want to keep. Click on the result to continue the process. Immediately, LinkMark will open a detailed preview environment for that specific result.
4 Reviewing the Content
Once the result is selected, LinkMark shows you a rich, detailed preview before anything is permanently saved. This preview visually includes:
The official page title.
A short, readable description of the content.
The original source link (URL).
A visual icon or preview image.
At this stage, you can quickly confirm that the result actually matches what you are looking for.
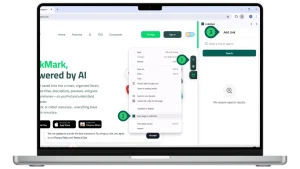
5 Enhancing the Link with AI (Optional but Powerful)
Before saving, you can drastically improve the clarity of the content using LinkMark’s integrated AI tools. This is a game-changer for digital organization. Available AI options include:
Rewrite with AI: Instantly improve the title and description to make them clearer and more concise.
Summarize with AI: Generate a quick, insightful summary of the actual page content.
Consequently, these smart tools help you understand the link much faster when you return to it weeks or months later.
6 Organizing Before Saving (Optional)
You can also organize the link immediately by:
Choosing a specific Folder to categorize the topic.
Adding relevant Tags for faster searching later.
While this step is optional and can be skipped if you want to save quickly, it is highly recommended for maintaining a clean workspace.
7 Saving the Link
When you are ready, click the “Add Link” button. The search result is now successfully saved as a regular LinkMark card and instantly appears on your main screen.
8 What Happens After Saving
Consistency is key. Once a search result is saved, it behaves exactly like any other manually added link. It can be searched, edited, organized, or archived at any time. The fact that it originated from a search result does not limit its functionality in any way.
Key Idea to Remember: Searching helps you discover content, but saving turns that discovery into something you can actually return to. LinkMark connects both steps into one smooth, uninterrupted flow.
Was this article helpful?
Your feedback helps us improve the content.
Have questions?
Our dedicated team is here to help you understand the docs.
In LinkMark, simplicity and consistency are our top priorities. Therefore, links saved directly from search behave exactly like any other link you have in your workspace. Once you save a search result, the source stops mattering. What matters is how clearly you organize, display, and access the content later.
2 How Saved Search Links Are Treated
After saving a search result, it undergoes a complete transformation. It stops being a temporary “search result” and becomes a permanent asset in your collection.
It becomes a regular, visually rich link card.
It appears immediately on your main screen alongside manually added links.
It can be opened, edited, or reorganized at any time.
As a result, there is no difference between a link saved from search and one added manually. They live together in perfect harmony.
3 What Information is Preserved?
A saved search link does not lose any of its context. In fact, LinkMark securely keeps all the vital information intact. A saved search link preserves:
The original page title for easy identification.
The short description to provide immediate context.
The source URL so you can always visit the original webpage.
Any AI enhancements you applied during the saving process (such as AI-generated summaries or rewritten titles).
This ensures the link stays meaningful and useful even when you return to it months later.
4 Using Saved Search Links Later
Because these links integrate so naturally into your workspace, you can manage them using all standard LinkMark tools. Saved search links can be:
Found quickly using the global search bar.
Filtered automatically by smart category tags.
Organized deeply into your custom folders.
Tagged with keywords or moved to the Archive when no longer needed.
5 Why This Consistency Matters
Discovery is only useful if the content stays usable later. Many other tools create separate, confusing lists for “Saved Searches” versus “Bookmarks.” By treating search results like any other standard link, LinkMark successfully avoids creating separate silos or confusing link types. Everything stays simple, predictable, and beautifully consistent.
Key Idea to Remember: Search helps you find valuable content, but LinkMark helps you keep it. Once saved, all links are equal, clear, and ready to be used.
Was this article helpful?
Your feedback helps us improve the content.
Have questions?
Our dedicated team is here to help you understand the docs.
Welcome to Chapter 3 of the LinkMark documentation! Saving links is only the first step of your journey. The real magic happens when you start organizing your content in LinkMark. This chapter explains how to bring structure to your saved links, ensuring your workspace remains clean, calm, and highly efficient.
You will learn how to fully control how links look, where they live, and how you access them later, all tailored to your personal workflow.
2 What You Will Learn in This Chapter
3 Flexible View Modes
We all process information differently. Therefore, you will learn how different view modes change the way links are visually displayed on your screen. These views help you scan quickly, review details deeply, or explore your content casually. Your underlying links stay exactly the same, but the layout adapts to how you think at that specific moment.
4 The Power of Folders and Tags
The chapter explains the essential difference between folders and tags, and how they work together harmoniously:
Folders act as the main structure, helping you group links by broad purpose or project (e.g., “Work,” “Recipes”).
Tags act as flexible labels, helping you describe links and connect them across different folders (e.g., “Urgent,” “To-read”). Using both gives you deep structure and ultimate flexibility at the same time.
5 Reordering and Smart Sorting
As your collection grows, order becomes critical. You will learn how to reorder and sort links to bring important items to the top and keep large lists under control. You can choose to arrange links manually just the way you like them, or let LinkMark handle the sorting for you automatically by date or alphabet.
6 Managing Link Visibility (Favorites, Pins, Archive)
Finally, this chapter introduces powerful tools to manage what you see on your daily dashboard:
Favorites help you mark highly important links with a star.
Pinning keeps your most-used links glued to the top of your list for instant access.
Archiving safely removes finished links from your main view without deleting them permanently.
7 Your Goal by the End of This Chapter
By the end of this chapter, you will know exactly how to keep your LinkMark space clean, clear, and effortless to use. You will be able to confidently organize links in a way that perfectly matches how you work and think.
Was this article helpful?
Your feedback helps us improve the content.
Have questions?
Our dedicated team is here to help you understand the docs.
Link view modes in LinkMark give you complete freedom and multiple ways to display your saved content. Because every user processes information differently, each view is carefully designed to match a specific way of browsing and thinking. You can switch between these views at any time without ever affecting or changing your underlying content.
2 Available View Controls
At the top of the main screen, you will easily find the view control buttons. These handy controls let you instantly change how your links are displayed visually. Common view options in LinkMark include:
Card View (Highly visual)
Compact View (Balanced)
List View (Text-heavy)
Grid-based variations
Regardless of the option you choose, each view shows the exact same links, just presented in a different layout.
3 Exploring the Different Views
4 Card View (For Visual Clarity)
Card view displays each saved link as a distinct, beautiful visual card. This mode is the default and highlights the link title, the preview image or icon, relevant tags, the source, and quick action buttons.
Card view is absolutely ideal when:
You want maximum visual clarity.
You rely on images or site icons to remember content (e.g., shopping items or design inspiration).
You prefer a calm, spacious, and modern layout.
5 Compact / List View (For Speed and Scanning)
List-based views deliberately reduce the visual size and focus heavily on text. It condenses the information so more links can fit on the screen at once.
This view is highly useful when:
You have a very large number of links to manage.
You want to scan through your collection quickly.
You care more about reading titles than looking at preview images.
You want faster scrolling and easier comparison between multiple links.
6 Seamlessly Switching Between Views
One of the best features of LinkMark is that you can change the view mode instantly. When you click a new view button, there is:
No page reload required.
No data change or loss of information.
No effect on your existing folders or tags.
This seamless experience lets you adapt the interface to your current task, rather than forcing you to adapt to the interface.
7 Choosing the Right View
Ultimately, there is no single “best” view. We recommend using visual views for casual exploration and compact views for deep review or organization. Switch freely as your needs change throughout the day.
Key Idea to Remember: Your content stays exactly the same; only the way you see it changes. LinkMark adapts to how you think, not just how you store links.
Link view modes in LinkMark
Was this article helpful?
Your feedback helps us improve the content.
Have questions?
Our dedicated team is here to help you understand the docs.
Using folders in LinkMark helps you group related links in one dedicated place. They are the backbone of a well-organized workspace. They make your content significantly easier to browse, scan, and manage. Instead of scrolling endlessly through all your saved links, you can simply open a specific folder and see only what matters to you at that exact moment.
2 Why Folders Matter
Without folders, your link collection can quickly become overwhelming. Folders help you:
Keep similar links together in one logical space.
Reduce visual clutter on your main screen.
Find links faster when you are in a hurry.
Build a clear structure for your digital life.
Essentially, they are incredibly useful when you save links for completely different purposes, such as separating your work research from your weekend entertainment.
3 When Should You Use Folders?
You should start using folders in LinkMark when:
You save links from many different categories.
You want a clear mental separation between topics.
Your main link list starts to grow beyond one page.
Example Cases:
A “Social Media” folder for inspiring posts and creator profiles.
A “Videos” folder dedicated strictly to YouTube tutorials and courses.
A “Work Tools” folder for articles, design assets, and productivity apps.
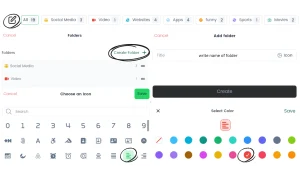
4 How Folders Work (Step-by-Step)
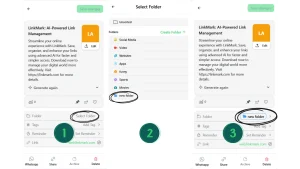
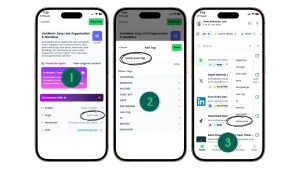
5 Create a New Folder
Open the Folders tab from your main navigation.
Click the “Create Folder” button.
Enter a short, descriptive folder name.
Choose an Icon (optional but recommended for visual clarity).
Choose a Color (optional).
Click “Create”. Your new folder will immediately appear in your folders list.
Creating folder in LinkMark
6 Add Links to a Folder
You can easily add a link to a folder while saving it or by editing it later:
Open the link details.
Tap the “Folder” option.
Select an existing folder from your list, or create a brand new one on the spot.
Save your changes. The link is now neatly grouped inside that folder.
Add link to folder
7 Folder Customization and Best Practices
LinkMark allows deep customization. Each folder can have a custom name, a unique icon, and a specific color. This visual customization makes your folders instantly recognizable at a glance.
8 Pro Tips for Better Organization:
Keep folder names short, clear, and action-oriented.
Use icons and colors to visually separate work from personal content.
Do not create too many folders at once. Start simple, and then organize more as your collection grows.
Key Idea to Remember: Folders bring peace of mind. By using folders in LinkMark, you transform a messy list of links into a structured, calm library.
Was this article helpful?
Your feedback helps us improve the content.
Have questions?
Our dedicated team is here to help you understand the docs.
While folders give you a rigid structure, using tags in LinkMark gives you ultimate flexibility. Tags help you label your links with specific keywords. They allow one single link to be connected to multiple topics at the exact same time.
Unlike folders, tags are completely flexible. They act like virtual stickers, helping you find and connect links from completely different folders using the same shared keyword.
2 Why Tags Matter
Tags unlock a new level of organization. They help you:
Find links faster using highly specific keywords.
Group links across different folders (e.g., an article in the “Work” folder and a video in the “Entertainment” folder can both be tagged with “Inspiration”).
Add meaning and context to saved links without moving them.
Search in a more flexible way when you cannot remember the exact title.
3 When Should You Use Tags?
You should use tags when a link does not fit into just one single box. Use tags when:
A link clearly belongs to more than one topic.
You want a quick way to filter a large list of links.
You naturally search using keywords rather than browsing visually.
Example Cases:
A complex tutorial tagged with: design, UI, learning.
A video tagged with: inspiration, work.
A tool tagged with: productivity, apps.
4 How Tags Work (Step-by-Step)
5 Add Tags to a Link
Open any saved link.
Click on the “Tags” field.
Type a new tag name.
Press Enter to add it.
Repeat to add more tags to the same link.
Save your changes.
6 Use Tags to Find Links
Finding tagged content is effortless. Simply use the main search bar, type a tag name (e.g., “design”), and LinkMark will instantly display all links with that tag, even if those links are stored in five different folders.
7 Tags vs. Folders: The Golden Rule
Folders and tags work best when used together. The golden rule to remember is:
Folders define where a link belongs (The Location).
Tags describe what the link is about (The Context).
One link can only be in one folder, but it can have multiple tags.
8 Pro Tips for Tagging
Keep tag names short and strictly clear (e.g., CSS, not cascading-style-sheets).
Avoid creating duplicate or very similar tags (e.g., use design instead of having both design and designs).
Use tags you will actually search for later.
Keep your naming consistent (e.g., always use lowercase).
Key Idea to Remember: Folders give you structure, but tags give you freedom. Using them together gives you the perfect LinkMark workspace.
Using tags in LinkMark
Was this article helpful?
Your feedback helps us improve the content.
Have questions?
Our dedicated team is here to help you understand the docs.
Reordering and sorting links help you take full control over how your saved content appears on your screen. You can choose to arrange links manually just the way you like them, or let LinkMark sort them automatically based on predefined rules. This flexibility gives you a clean, organized view that perfectly matches how you think and work.
2 Why Reordering and Sorting Matter
As your collection grows, chronological order is not always the best way to view your links. These powerful tools help you:
See important links first without scrolling.
Group related links visually to maintain focus.
Reduce visual clutter in large, heavy link lists.
Keep your workspace clear and highly efficient.
3 When Should You Use It?
You should actively use reordering or sorting when:
You want your most important, daily-use links at the very top.
You need to review links in a specific, prioritized order.
You are working with a large batch of links at once.
Example Cases:
Dragging today’s research links to the top of the list.
Sorting links alphabetically to find a specific website easily.
Rearranging links sequentially before a presentation or a meeting.
4 Reordering Links Manually (Drag & Drop)
If you prefer total control, you can manually change the order of links using the intuitive drag-and-drop feature.
How it works (Step-by-Step):
Open any folder or link list.
Hover over the specific link you want to move.
Click and hold the drag handle (usually represented by a grid icon).
Move the link up or down to its new position.
Release the mouse button to place it. The new custom order is saved automatically and instantly.
5 Automatic Sorting and View Modes
If you do not want to arrange things manually, you can use automatic sorting options (like Alphabetical or Date Added) to organize large collections instantly.
Furthermore, different views work better for different tasks. You can seamlessly switch between Grid view and List view. LinkMark is smart; each view strictly respects your current order and sorting preference.
6 Pro Tips for the Best Experience
Use drag-and-drop for priority-based order in smaller folders.
Use automatic sorting for large, heavy link collections.
Combine folders, tags, and custom sorting for the ultimate organized workspace.
Key Idea to Remember: LinkMark does not force a specific order on you. Whether you sort automatically or drag links manually, the app adapts to your workflow.
Was this article helpful?
Your feedback helps us improve the content.
Have questions?
Our dedicated team is here to help you understand the docs.
Favorites and pinning links are two powerful features designed to help you keep your most important content incredibly easy to reach. They are exceptionally useful when you work with links you open frequently, or links you absolutely need to see first every time you open LinkMark. You can use these two features together for maximum efficiency or separately depending on your workflow.
2 The Difference: Favorites vs. Pinning
3 What is “Favorites”?
The Favorites feature lets you mark links that you care about deeply. Favorited links are automatically grouped in a dedicated “Favorites” view and can be searched separately. Importantly, they are not moved from their original folders or tags; they are simply marked with a badge of importance.
4 What is “Pinning”?
While Favorites group links by importance, Pinning controls visibility. Pinning keeps a link permanently at the top of your current list. Pinned links will always appear first, no matter how many other links you add or how you sort your list. This is extremely helpful for daily-use links.
5 When Should You Use This?
Use Favorites when:
You want to remember important research or resources.
You do not want to move or reorganize the links.
You want a clean, separate list of your absolute best links.
Use Pinning when:
You need a specific link visible all the time.
You open the exact same link every single day (e.g., a project dashboard or a workout video).
Instant visibility matters more than categorization.
6 How it Works (Step-by-Step)
7 Mark a Link as Favorite
Find the desired link in your list.
Tap or click the heart (♥) icon on the link card.
The link is now instantly added to your Favorites. You can open the dedicated Favorites tab from the main navigation to see them all in one place.
8 Pin a Link to the Top
Open the options menu (⋯) on the link card.
Select the “Pin” option.
The link instantly moves to the very top of the list and stays visible until you decide to unpin it.
9 Removing Favorites or Pins
You are always in control. To remove a favorite, simply tap the heart (♥) icon again. To unpin a link, open the options menu and select “Unpin” to restore its normal order.
10 Pro Tips for Best Results
Use Favorites for importance and Pinning for visibility.
A single link can be Favorited and Pinned at the same time.
Keep your pinned list short (under 5 links) to maintain a clean workspace.
Key Idea to Remember: Stop searching for the same links every day. Use Favorites and Pinning to put your best content exactly where you need it.
Was this article helpful?
Your feedback helps us improve the content.
Have questions?
Our dedicated team is here to help you understand the docs.
Archiving links in LinkMark is the ultimate tool for maintaining a clean and focused workspace. It helps you hide links you do not need right now without permanently deleting them.
When you archive a link, it stays perfectly saved, but it is moved out of your main daily view. Use the Archive feature when you want to significantly reduce visual clutter while keeping your valuable links safely stored for later use.
2 When Should You Use the Archive?
LinkMark users often struggle between keeping a link on the main screen or deleting it forever. Archiving provides the perfect, safe middle ground. You should use the Archive when:
A link is no longer active: You do not need to check it daily anymore.
You finished using a resource: You are done with it now, but you may need to reference it later.
You want to clean your main screen: You want to focus only on current tasks without losing old research.
Real-life Examples:
An online course you just finished.
A long news article you already read.
A temporary reference link for a project that is now completed.
3 How Archiving Works (Step-by-Step)
4 Archive a Link
Open your Home or Favorites view.
Find the specific link you want to hide.
Tap or click the three dots (•••) on the link card to open the options menu.
Select “Archive”. The link is immediately moved to your Archive section, leaving your main list clean.
5 View Your Archived Links
Out of sight does not mean lost. To view your history:
Go to the bottom navigation bar.
Select the “Archive” tab.
You will see all your archived links safely stored there, completely separated from your active daily links.
6 Restore (Unarchive) a Link
If you need an archived link back in your main workflow:
Open the Archive section.
Find the link, then swipe it or open the link menu.
Select “Unarchive”. The link instantly returns to your main list.
7 Delete a Link Permanently
If you are absolutely sure you no longer need the link:
Go to the Archive.
Swipe the link or open the menu.
Select “Delete”. Note: This action permanently removes the link from your account.
8 Pro Tips for Link Management
Archiving is always safer than deleting. If you are unsure about a link, archive it.
Periodically move older links to the Archive to keep LinkMark running fast and looking clean.
You can always restore archived links later with zero data loss.
Key Idea to Remember: Archiving brings peace of mind. It allows you to clean up your digital space without the fear of losing your information.
Was this article helpful?
Your feedback helps us improve the content.
Have questions?
Our dedicated team is here to help you understand the docs.
Deleting links in LinkMark is the final action you can take on a saved item. Unlike archiving, which simply moves the link to a safe storage area, deleting removes the link, its image, and all its metadata completely and permanently from your database.
Once you delete a link, neither you nor the support team can recover it. Use the delete option only when you are absolutely sure you no longer need the content.
2 When Should You Delete? (Digital Hygiene)
While we generally recommend Archiving, deleting is necessary for maintaining good “digital hygiene.” You should delete a link when:
The link is broken (404 Error): The website no longer exists, so the link is useless.
The content is irrelevant: It was a temporary link (like a tracking code or a one-time ticket) that has no future value.
It is a duplicate: You accidentally saved the same link twice.
You made a mistake: You saved the wrong page by accident.
3 How It Works (Step-by-Step)
4 Method 1: Delete from Home or Favorites
If you want to remove a link directly from your active list:
Open the Home or Favorites feed.
Find the specific link you want to remove.
Tap or click the three dots menu (•••) located on the link card.
Select the Delete option (usually marked in red).
Confirm the action: A pop-up will ask you to confirm. This safety step prevents accidental clicks.
The link is removed permanently.
5 Method 2: Delete from Archive
Sometimes you want to clean up your old history. To delete a link that is already archived:
Go to the Archive section from the sidebar.
Find the archived link.
On Mobile: Swipe the link card to reveal the delete action.
On Web/Desktop: Click the menu and select Delete.
Confirm the action to erase it forever.
6 Important Warning: Delete vs. Archive
It is crucial to understand the risk.
Archive: Safe. Moves link out of sight. Can be restored anytime.
Delete: Destructive. Erases data forever. Cannot be restored.
Rule of Thumb: If you have even 1% doubt that you might need this link in the future, do not delete it. Archive it instead. Storage space is not an issue, but lost data is.
7 Pro Tips for Safety
Review before confirming: Always double-check the title before hitting the final “Delete” button.
Clean up periodically: Once a month, check your Archive and delete broken links to keep your database fast and clean.
Key Idea to Remember: Deleting is permanent. There is no “Undo” button for this action. Proceed with caution.
Was this article helpful?
Your feedback helps us improve the content.
Have questions?
Our dedicated team is here to help you understand the docs.
Welcome to Chapter 4 of the LinkMark documentation! In traditional bookmarking, saving a link usually means storing a raw, ugly URL that means nothing to you weeks later. LinkMark changes this completely.
This chapter explains how LinkMark intelligently turns standard saved links into rich Link Cards. A Link Card gives each link structure, context, and visual clarity. Instead of relying on your fading memory, Link Cards show you important details at a single glance, helping you remember exactly why you saved a link, even after a long time.
2 What You Will Learn in This Chapter
3 Anatomy of a Link Card
You will explore the complete layout of a Link Card. We will show you how visual titles, readable descriptions, organized folders, tags, and quick-action buttons all work together. Consequently, each element helps you understand and manage your links much faster.
4 Full Editing Control
You will learn how to edit a Link Card with ease. Editing allows you to adjust titles, refine descriptions, manage tags, switch folders, and even set reminders. These adjustments ensure your links stay clear and highly meaningful over time.
5 Smart Assistance with AI Features
This chapter introduces the powerful AI features embedded directly inside Link Cards. The integrated AI acts as your personal research assistant. It helps you:
Clean up messy text automatically.
Rewrite with AI to fix unclear or clickbait titles.
Summarize with AI to compress long articles into key points.
Most importantly, you will learn that AI works purely as an assistant. It never changes anything without your explicit approval, keeping you in full control of your data.
6 The “Show Content” Preview Experience
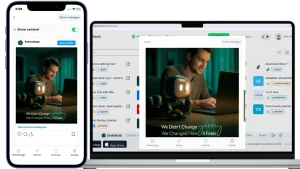
Finally, the chapter explains the Show Content preview feature. This powerful tool lets you preview supported content directly inside LinkMark. You can review articles and pages quickly without opening extra browser tabs or leaving your workspace.
7 Your Goal by the End of This Chapter
By the end of this chapter, you will deeply understand how Link Cards and AI in LinkMark work together to create the ultimate bookmarking experience. You will be able to manage, review, and return to your saved links with unmatched speed and absolute clarity.
Was this article helpful?
Your feedback helps us improve the content.
Have questions?
Our dedicated team is here to help you understand the docs.
A Link Card in LinkMark represents the fundamental building block of your digital library. It is the main way LinkMark stores, processes, and displays your saved content.
Instead of saving a raw, messy URL , LinkMark automatically transforms every link you add into a clean, visually structured card. This card format makes your content easy to read, simple to search, and effortless to manage. Essentially, it adds context and meaning, turning a simple web address into a useful piece of knowledge.
2 Why It Matters: Solving “Link Amnesia”
Traditional browser bookmarks have a major flaw: they only save URLs. However, human memory doesn’t work that way. Over time, you may suffer from “Link Amnesia”—opening a saved folder weeks later and forgetting:
Why did I save this in the first place?
What is this page actually about?
Is it still useful for my current project?
The Link Card in LinkMark solves this problem permanently by keeping the meaning of each link visible. Even months later, you immediately understand why a link matters without ever needing to click and re-open the page.
3 The Anatomy of a Link Card
Unlike flat text bookmarks found in Chrome or Safari, LinkMark presents links in a rich, visual format. Each saved link automatically includes:
A Clear Title: Extracted directly from the page metadata.
A Concise Description: A snippet summarizing the content.
Visual Context: A thumbnail image (when available) to help you recognize the site.
Source Info: The platform name (e.g., YouTube, Medium).
Quick Actions: Instant buttons to Favorite, Pin, Archive, or Delete.
Everything appears in one unified view, allowing you to assess a link’s value at a single glance.
4 How It Works (Automatic by Design)
LinkMark removes all manual effort from the process. You do not need to type titles or descriptions yourself.
You Save: Click the extension button or share from mobile.
We Analyze: LinkMark analyzes the content in the background instantly.
We Display: The system generates the structured Link Card on your dashboard. No setup. No extra steps. Just save and go.
5 Common Questions (FAQ)
6 Is this different from a regular bookmark?
Yes. A regular bookmark is just a static address. A Link Card in LinkMark is a dynamic object that stores context, meaning, structure, and visual cues.
7 Do I need to create the card manually?
No. LinkMark generates everything automatically the moment you save a link.
Key Idea to Remember: A Link Card acts as a “Smart Bookmark.” It remembers the context for you—so you never have to rely on your own memory again.
Was this article helpful?
Your feedback helps us improve the content.
Have questions?
Our dedicated team is here to help you understand the docs.
Each Link Card layout in LinkMark is carefully divided into clear, functional sections. Every single section has a specific purpose. Nothing on the card is purely decorative or unnecessary. This smart layout is specifically designed to help you understand the link instantly and act on it without ever needing to open the original webpage.
2 What Elements Does a Link Card Include?
A complete Link Card is made up of six independent, yet connected elements. Let’s break down how each element works to keep your workspace clear.
3 Link Preview (Visual Anchor)
This is the visual part of the card. It usually displays either the official website icon (favicon) or a rich preview image extracted from the page. This visual anchor helps you recognize the link much faster, especially when you are rapidly scanning through a long list of saved items.
4 The Title
The title explains exactly what the link is about. It is designed to be short, clear, and easy to scan. Furthermore, you can edit the title at any time if you want to make it more meaningful or personal to your workflow.
5 The Description
The description provides deeper context. It briefly explains what the page contains and why this link actually matters. You can keep the automatically generated description as is, or edit it later to add your own personal notes.
6 Source or Platform
This subtle element shows exactly where the link comes from (e.g., a specific Website, a Social media platform, or a News App). This helps you quickly understand the type of content you saved at a glance.
7 Folders and Tags
These organizational tools appear directly on the card face. They help you group related links and filter them later. Generally, Folders define the broad category (like “Work”), while Tags provide specific details (like “Design” or “Urgent”).
8 Action Icons
Each card includes a row of quick-action icons. Directly from the card, you can:
Add the link to Favorites.
Pin the link to the top.
Archive it instantly.
Open the menu for more options. These actions save significant time and reduce extra clicks.
9 When Should You Use the Card Layout?
The Link Card layout is your primary view. You use it when you are browsing your collection, searching for something specific, or deciding what to keep, archive, or delete. With this rich layout, you rarely need to open the full link to know what is inside.
10 Common Questions (FAQ)
11 Can I edit any part of the Link Card?
Yes. Almost all text elements, including the title, description, and tags, are fully editable to match your preferences.
12 Do all platforms show the same layout?
Yes. The Link Card layout is beautifully consistent across both the web dashboard and mobile apps.
13 Pro Tips for Better Cards
Rewrite titles so they make sense to your future self.
Keep your descriptions short and to the point.
Use Folders for main structure and Tags for small details.
Key Idea to Remember: A Link Card brings order to the chaos of the web. Every element on the card is designed to save you time and mental effort.
Link Card preview
Was this article helpful?
Your feedback helps us improve the content.
Have questions?
Our dedicated team is here to help you understand the docs.
Editing a Link Card lets you fully customize how a saved link appears and behaves inside your workspace. You can easily change the title, refine the description, move it between folders, update tags, and adjust other details—all without changing the original website link. This crucial feature helps you keep your saved content clear, personal, and highly meaningful to you over time.
2 What Can You Edit in a Link Card?
LinkMark gives you total control. You can edit the following elements on any card:
Title: Make it shorter or more relevant.
Description: Add your own notes or summaries.
Folder: Change where the link lives.
Tags: Add specific keywords for faster search.
Reminder: Turn the link into an actionable task.
Link URL: Update the source if the website changes.
Remember, each change updates only your personal card, not the original website.
3 When Should You Edit a Link Card?
You do not need to edit every single link you save. However, you should edit a Link Card when:
The automatically generated title is unclear or clickbaity.
The description is too long, vague, or missing entirely.
You want to move the link to a specific project folder.
You want to add custom tags for easier future searching.
You plan to return to the link later and need a push to do so.
4 How It Works (Step-by-Step Guide)
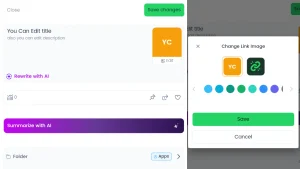
5 Step 1: Open the Link Card
Tap or click on any saved link. Instantly, the detailed Link Card screen will open, showing all the current information.
6 Step 2: Edit the Title or Description
Tap “Edit” next to the title or description. Update the text to something clearer. Always use your own words, and remember that shorter is usually better for quick scanning.
7 Step 3: Assign a Folder
Tap “Folder” to organize the content. You can choose an existing folder from your list or create a brand new one on the spot. This effectively groups related links together.
8 Step 4: Add or Edit Tags
Tap “Tags” to add one or more keywords. Keep tags specific (e.g., CSS, budget). Ultimately, good tags significantly improve your search results later.
9 Step 5: Set a Reminder (Optional)
This is a powerful feature for productivity. Tap “Reminder” and choose a specific date and time. You will get a notification when it is time to review the link, ensuring you never forget important content.
10 Step 6: Save Changes
When you are finished, tap “Save changes”. Your updates are applied instantly across all your devices.
11 Pro Tips for Better Editing
Use titles that explain why you saved the link, not just what the page is called.
Do not overload one card with too many tags; keep it simple.
Use reminders only for links that actually need action (like a bill to pay or a long video to watch).
Key Idea to Remember: Editing a Link Card transforms raw web data into personal knowledge. You are shaping the content to fit your brain.
Edit a Link Card
Was this article helpful?
Your feedback helps us improve the content.
Have questions?
Our dedicated team is here to help you understand the docs.
The AI features inside a Link Card are designed with one specific goal: to help you understand your saved content instantly and remove digital clutter. Think of it as a personal research assistant that works quietly in the background.
Most importantly, we want to be crystal clear: these AI tools never change the original webpage. They only help you make your personal Link Card clearer, easier to read, and simpler to search for later. The AI works strictly inside the card—not on the source itself.
2 Why LinkMark Uses AI? (Solving Link Amnesia)
In a fast-paced digital workflow, people often save links quickly without thinking. A week later, you might open your list and suffer from “Link Amnesia.” You look at a link and wonder:
What is this content actually about?
Why did I save this in the first place?
Is this still relevant to my current project?
The AI features inside a Link Card solve this problem by adding instant clarity and meaningful context. Instead of forcing you to re-read an entire article to remember its value, the AI gives you the answer at a glance.
3 What AI Helps You Do
Inside any individual Link Card, LinkMark’s AI empowers you to:
Fix Titles: Turn unclear, messy, or clickbait titles into clean, descriptive ones.
Refine Descriptions: Rewrite long, SEO-stuffed descriptions into concise, human-readable text.
Generate Summaries: Create short, punchy summaries for very long content so you get the gist immediately.
4 How AI Works: You Stay in Control
LinkMark designs the AI workflow to keep you 100% in the driver’s seat. Nothing happens automatically without your permission:
Open: You open a Link Card details view.
Choose: You tap an AI action button (such as Summarize or Rewrite).
Review: The AI generates a smart suggestion.
Decide: You review the result and decide to either Apply it or Discard it.
5 Guardrails: What AI Does Not Do
To maintain your trust and safety, LinkMark’s AI operates within strict boundaries. It never:
Changes the source URL or the original website content.
Publishes your private notes or shares your data publicly.
Overwrites your existing manual text automatically.
Acts without your explicit confirmation button press.
Key Idea to Remember: AI in LinkMark acts as a smart assistant—not a decision-maker. It saves you time, reduces mental effort, and keeps you in total control of your workspace.
Was this article helpful?
Your feedback helps us improve the content.
Have questions?
Our dedicated team is here to help you understand the docs.
Rewrite with AI is a powerful feature in LinkMark designed to help you instantly improve the text inside a Link Card. It smartly rewrites the auto-generated title or description to make it significantly clearer, shorter, and much easier to understand. Most importantly, the original website link stays exactly the same. Only the text on your personal card is improved.
2 Why This Feature Matters
When you save a link from the internet, the metadata is not always perfect. Many links naturally come with:
Extremely long or truncated titles.
Clickbait or unclear wording that does not explain the content.
Overly technical, messy, or irrelevant descriptions.
Rewrite with AI helps clean up this digital mess. It transforms confusing text into readable information, allowing you to understand the link at a single glance.
3 When Should You Use It?
This feature is highly useful both at the moment of saving a link and later when organizing your workspace. Use Rewrite with AI when:
The original title does not explain the link clearly.
The description is too long, vague, or filled with promotional text.
You saved the link quickly on mobile and did not have time to edit it.
You are reviewing old links and want to refresh their context.
4 How It Works (Step-by-Step)
5 Step 1: Open the Link Card
Tap or click the specific link you want to edit. This will open the detailed Link Card view.
6 Step 2: Choose “Rewrite with AI”
Find the Rewrite with AI magic wand icon. You can select whether you specifically want to rewrite the Title or the Description.
7 Step 3: Review the AI Suggestion
In seconds, the AI generates a clearer, more concise version of the text. Read the suggestion carefully. At this stage, nothing is applied yet.
8 Step 4: Apply or Discard
Choose “Apply” to instantly replace the old text with the new AI suggestion, or click “Cancel” to keep the original text. You stay in full control of the outcome.
9 What the AI Does (and Does NOT Do)
To ensure safety and accuracy, it is important to know the boundaries of this feature.
What Rewrite with AI DOES:
Makes text shorter and much clearer.
Removes unnecessary filler words and marketing fluff.
Drastically improves readability for future scanning.
What Rewrite with AI DOES NOT DO:
It does NOT change the source link itself.
It does NOT add new, fake information to the card.
It does NOT apply any changes automatically without your click.
Key Idea to Remember: Rewrite with AI turns messy web links into clean, personal knowledge. Use it to keep your Link Cards simple and effective.
Rewrite with AI
Was this article helpful?
Your feedback helps us improve the content.
Have questions?
Our dedicated team is here to help you understand the docs.
Summarize with AI is a game-changing feature that creates a smart, short summary of the actual link content. It effectively helps you understand what a webpage or article is about without ever needing to open the full link. Once generated, this summary is permanently added to the Link Card for quick future reference.
2 Why This Feature Matters (Solving the Backlog)
We all save content that we promise to read later. However, many links are:
Exceptionally long articles (10-minute reads or more).
Dense tutorials and complex technical guides.
Detailed news reports or industry documents.
Opening and reading these every single time just to remember why you saved them takes too much time. Summarize with AI saves significant time and mental energy by giving you the core key ideas in just a few simple lines.
3 When Should You Use It?
This feature is completely optional, but incredibly helpful. Use Summarize with AI when:
The original content is too long to read right now.
You need a quick refresher on an article you read months ago.
You are reviewing old links and need to decide whether to keep or archive them.
You are doing research and want to compare multiple sources quickly.
4 How It Works (Step-by-Step)
5 Step 1: Open the Link Card
Tap or click the specific link you want to analyze to open the detailed card view.
6 Step 2: Choose “Summarize with AI”
Select the “Summarize with AI” option. Instantly, the AI engine starts reading and analyzing the content of the linked webpage.
7 Step 3: Review the Summary
Within seconds, a short, digestible summary appears directly on the card. Read it to quickly understand the main ideas and takeaways.
8 Step 4: Save or Edit
You can keep the summary exactly as it is, or you can easily edit it to match your own personal notes. You always control the final text saved to your workspace.
9 What the AI Does (and Does NOT Do)
To ensure transparency, it is important to know how the summarization tool operates.
What Summarize with AI DOES:
Intelligently extracts the most important key points.
Shortens extremely long content into a readable paragraph.
Makes reviewing large link collections much faster.
What Summarize with AI DOES NOT DO:
It does NOT replace the value of deeply reading the full article.
It does NOT change the original website’s content.
It does NOT auto-save any summary without your final review.
10 Common Questions (FAQ)
11 Can I edit the AI summary?
Yes. The generated summary becomes regular text on your card, meaning it is fully editable.
12 Does every link support summarizing?
No. It depends on the website’s structure and permissions. Some paywalled or heavily restricted sites cannot be summarized.
13 Can I remove the summary later?
Yes. You can edit or delete the summary text at any time.
Key Idea to Remember: Summarize with AI gives you the “TL;DR” (Too Long; Didn’t Read) version of any link. Use it to save time and clear your reading backlog effortlessly.
Was this article helpful?
Your feedback helps us improve the content.
Have questions?
Our dedicated team is here to help you understand the docs.
Show Content in LinkMark is a powerful feature that lets you preview supported link content directly inside your workspace. Instead of opening a completely new browser tab, you can view the content directly within the Link Card. For some links, you can read the full article effortlessly. For others, LinkMark will simply show the standard link details. This dynamic behavior depends entirely on the original source of the link.
2 Why This Feature Matters (Save Your Focus)
Switching between apps and tabs breaks your mental flow. The Show Content feature helps you review certain links significantly faster while maintaining your focus. It is especially useful for:
Social media posts (e.g., viewing a tweet or a thread directly).
Articles and text-heavy pages (e.g., blogs and news).
Supported app and web content.
When the preview is available, you can understand the content quickly, extract what you need, and move on without cluttering your browser with endless open tabs.
3 When Should You Use It?
You should use the Show Content feature when:
You want a quick look at a link to remember what it is.
You are reviewing short social media content.
You want to avoid opening heavy websites just to check one detail.
If the in-app preview is not available for a specific site, you can always open the original link with a single click.
4 How It Works (Step-by-Step)
5 Step 1: Open the Link Card
Tap or click the saved link to open its detailed card view.
6 Step 2: Enable “Show Content”
Turn on the “Show Content” toggle. LinkMark will immediately attempt to load a live preview of the website. If the source successfully supports the preview, the actual web content will smoothly appear inside the card.
7 Step 3: Review the Preview
Scroll through the visible content just like a normal webpage. Read the available preview, and then quickly decide whether to keep, organize, or archive the link.
8 What “Show Content” Supports (and Limitations)
Not all websites are built the same. Availability strictly depends on the source platform’s security rules, the content type, and access restrictions (like paywalls).
What Show Content DOES NOT do:
It does NOT guarantee a preview for every single link on the internet.
It does NOT bypass platform security restrictions (e.g., sites that block external embedding).
It does NOT change the original content.
If a preview is not available, LinkMark elegantly falls back to showing the standard link card details.
9 Pro Tips
Use Show Content as a quick “glance” tool, not a full reading browser.
Do not rely on it for secure logins or heavy media sites.
Always open the original link for full functionality and the best user experience.
Key Idea to Remember: Show Content keeps you in the zone. Preview what you can inside the app, and open the rest in your browser.
Show Content in LinkMark
Was this article helpful?
Your feedback helps us improve the content.
Have questions?
Our dedicated team is here to help you understand the docs.
Welcome to Chapter 5 of the LinkMark documentation! This chapter explains LinkMark Premium features and what they specifically add to the app.
It is designed to help you clearly understand the difference between the standard free experience and the upgraded Premium plan. Importantly, Premium is completely optional. The free version works perfectly on its own for everyday use, while Premium adds powerful tools, advanced automation, and fewer limits for power users.
2 What You Will Learn in This Chapter
3 Advanced Premium AI Features
This chapter explains the exclusive AI features available in the Premium plan. You will see how Rewrite with AI and Summarize with AI help you review links drastically faster. These premium tools improve clarity and save mental energy, but they always act as assistants and never replace your final decisions.
4 The Power of Advanced Search
You will also learn about the Advanced Search feature unlocked in Premium. This section clearly explains how Premium search differs from the basic search. It shows exactly when advanced search is useful (e.g., deep diving into massive link libraries) and when the free search is more than enough for your needs.
5 The Ad-Free Experience
The chapter also covers the distraction-free Premium interface. You will learn how removing ads creates a significantly cleaner, calmer, and more focused workspace. Nothing else changes in how your links work; you simply get a quieter environment to do your best work.
6 Plans, Limits, and Policies (Total Transparency)
Finally, this chapter thoroughly explains our subscription plans, fair usage limits, and official policies. You will understand how subscriptions work, how AI limits apply, and where to find important legal information regarding cancellations and refunds.
7 Your Goal by the End of This Chapter
By the end of this chapter, you will know exactly if LinkMark Premium features fit your personal or professional needs. You will not only understand the value of the upgrade, but you will also know how to upgrade, manage, or cancel your plan with total confidence.
Was this article helpful?
Your feedback helps us improve the content.
Have questions?
Our dedicated team is here to help you understand the docs.
LinkMark Premium is an optional paid plan that gives you full access to advanced features inside the app. It is specifically designed for power users, researchers, and professionals who save a lot of links and want fewer limits, more AI tools, and a cleaner experience.
It is important to know that you can use LinkMark for free forever. Premium is only for users who want more control and extended capabilities.
2 What You Get with Premium
When you upgrade to LinkMark Premium, you unlock the full potential of your digital workspace. You get to:
Use AI Features More Frequently: Enjoy a higher daily allowance for all AI-powered actions.
Generate AI Summaries: Instantly create short, smart summaries for long articles and saved links to save reading time.
Rewrite with AI: Edit messy link titles and descriptions automatically to make your dashboard perfectly clear.
Use Advanced Search: Unlock deeper search capabilities to find specific links instantly, no matter how large your collection grows.
Enjoy an Ad-Free Experience: Remove all advertisements for a completely distraction-free, quiet, and focused workspace.
3 Who is Premium For?
Premium is the perfect choice for you if:
You save dozens of links every single week.
You rely on LinkMark for daily work or heavy academic research.
You value speed and want to automate organization with AI.
You prefer a minimalist interface without any banner ads.
4 Important Notes and Transparency
We believe in total transparency. Before upgrading, please note:
Premium is Optional: The core saving and organizing features remain free. LinkMark Premium does not change how your links basically work; it simply adds extra tools.
Cancel Anytime: You can cancel your subscription easily at any time directly from your App Store or Google Play account.
Fair Usage Limits: To ensure fast performance for everyone, some intensive AI features may still have daily usage limits.
Pricing Variations: Prices may vary slightly depending on your specific country, local currency, and app store taxes.
Key Idea to Remember: LinkMark Premium does not change your content. It simply adds powerful tools to help you work faster, think clearer, and stay more comfortably organized.
Was this article helpful?
Your feedback helps us improve the content.
Have questions?
Our dedicated team is here to help you understand the docs.
LinkMark Premium AI features are expertly designed to help you work with your saved links faster and with significantly less mental effort. These powerful tools are strictly intended to add clarity to your workspace, not to replace your own human decisions. All AI features are completely optional and work exclusively inside the Link Card view, ensuring your original content remains untouched.
2 What AI Features Are Included?
With LinkMark Premium, you get extended, reliable access to our core artificial intelligence tools:
Rewrite with AI: Instantly improve messy titles and descriptions to make them clearer, shorter, and highly readable.
Summarize with AI: Automatically create short, insightful summaries for long articles, news, or complex research pages.
Consequently, these features help you understand the context of your links instantly, without ever needing to open a new tab.
3 Why These Features Matter (The Problem Solved)
Information overload is a real problem. Premium AI features are a lifesaver when:
You save dozens of links in a hurry on your mobile device.
Auto-generated titles are clickbaity, unclear, or too long.
The saved content is a deep, 20-minute read.
You are reviewing months-old links and need a quick refresher. Instead of guessing, AI helps you see the main idea in seconds.
4 When Should You Use Premium AI?
Use LinkMark Premium AI features when:
You rely heavily on LinkMark for professional work, content creation, or academic study.
You save many links every day and need faster cleanup.
You want to reduce your reading backlog. (Note: If you only save a few simple links per week, the standard free experience may be enough for you).
5 How Premium AI Works: You Are in Control
The workflow is designed for maximum safety:
Open a Link Card.
Choose a Premium AI option (Summarize or Rewrite).
Review the AI-generated result.
Apply it only if you want to keep it. Nothing is applied automatically. You always stay in complete control.
6 Usage Limits and Fair Usage
To keep the service stable and fast for everyone, Premium AI features may have daily or monthly usage limits. These limits are necessary because AI requires significant computing power. The limits ensure fair usage across all Premium users and may vary slightly based on your specific plan tier.
7 Common Questions (FAQ)
8 Do I need Premium to use AI?
Yes. Advanced AI processing capabilities are exclusively part of the LinkMark Premium plan.
9 Can I turn AI off?
Yes. You can completely ignore the AI buttons and use LinkMark manually, just like the free version.
10 Does AI work on every link?
No. Some complex websites, paywalled content, or secure pages may not support AI data extraction.
Key Idea to Remember: LinkMark Premium AI features are your smart assistants. They do the heavy lifting of reading and summarizing, so you can focus on deciding what matters.
Was this article helpful?
Your feedback helps us improve the content.
Have questions?
Our dedicated team is here to help you understand the docs.
LinkMark includes two distinctly different web search experiences. Both allow you to actively discover new content from inside the app, but they serve different needs. The Basic Search is available for everyone, while Advanced Search in LinkMark is an exclusive feature reserved for Premium users who need a deeper, more professional research tool.
2 Basic Web Search (Free) vs. Advanced Search (Premium)
3 Basic Web Search (The Free Experience)
The basic web search is readily available in the free version of LinkMark. It is perfect for casual users. It allows you to:
Search the web inside the app.
Discover general topics quickly.
View simple text results. While highly useful for quick lookups, it naturally offers limited control and filtering options.
4 Advanced Search (The Premium Experience)
Advanced Search is a far more professional and tailored search experience. Powered by a dedicated, high-performance search provider, it lets you customize exactly what type of content you want. With Advanced Search, you can specifically search by:
Web Pages (Optimized standard search)
Images (Visual inspiration)
Videos (Tutorials and entertainment)
News (Latest updates and articles)
This upgrade guarantees better accuracy, higher quality results, and a much cleaner visual display.
5 Crucial Clarification: Web Search vs. Saved Links
It is very important to understand that LinkMark uses two separate search systems:
Saved-Link Search: Finds links you already saved in your folders.
Web Search (Basic & Advanced): Discovers new content from the internet.
Advanced Search strictly powers the “Web Search” feature. It does not affect how you find your previously saved links.
6 When Should You Use Advanced Search?
You should upgrade to use Advanced Search when:
You frequently need to find and save rich media (Images and Videos).
You want a highly focused, distraction-free research experience.
You need up-to-date News results for your projects.
You prefer total control over your content discovery process. (Note: For simple browsing, the basic search is more than enough).
7 How It Works (Step-by-Step)
Open the “Web Search” screen inside LinkMark.
Choose your specialized search mode (Web, Images, Videos, or News).
Enter your specific query and hit search.
Review the premium-optimized results.
Save any result directly as a Link Card instantly.
8 Common Questions (FAQ)
9 Is web search available without Premium?
Yes. Basic web search is completely free and available to all users.
10 What does Premium add to search?
Premium adds categorized search types (Images, Videos, News), advanced filtering, and a dedicated high-quality search provider for better accuracy.
11 Does this replace the saved link search?
No. Web search and saved-link search are completely separate functions inside the app.
Key Idea to Remember: Advanced Search turns LinkMark from a simple archive into a powerful discovery engine. It gives you the exact results you need, instantly.
Was this article helpful?
Your feedback helps us improve the content.
Have questions?
Our dedicated team is here to help you understand the docs.
LinkMark is fundamentally designed to be clean, organized, and easy to use. In the free version, the interface includes advertisements to support the platform. However, these ads are strictly non-intrusive and never block your workflow.
For users who prefer absolute visual silence, LinkMark Premium offers a dedicated Ad-Free Experience. This upgrade completely removes all ads, providing a quieter, more focused environment.
2 Why This Option Exists
In today’s fast-paced digital world, visual noise can reduce your productivity. The Ad-Free Experience is specifically made for users who want:
Fewer visual distractions on their screen.
Maximum focus while doing heavy research or working.
A calmer workspace that feels like a private, professional library.
A minimalist aesthetic that puts their content front and center.
3 When Should You Use It?
You should consider switching to the ad-free experience if:
You spend long hours inside LinkMark every day.
You use the app heavily for professional work, coding, or academic study.
You personally prefer minimal and ultra-clean user interfaces. (Note: If occasional ads do not bother you, the free version works perfectly well).
4 What Changes (And What Does Not)
5 What Changes with Premium:
When you upgrade, the transformation is instant. Ads are entirely removed from the interface. Consequently, the layout feels significantly cleaner, loading times may feel smoother, and your daily focus improves.
6 What Does NOT Change:
It is important to know that functionality remains consistent.
Core features and performance stay exactly the same.
Your saved links and data are completely unaffected.
The overall app behavior remains familiar.
7 Common Questions (FAQ)
8 Are ads disruptive in the free version?
No. We respect your workflow. Ads in the free version are kept minimal, polite, and strictly non-blocking.
9 Does “Ad-Free” add new link features?
No. This specific feature only removes ads. (However, Premium does include other separate features like advanced AI and smart search).
10 Can I go back to the free version later?
Yes. You can cancel your Premium plan anytime, and your account will smoothly revert to the free version.
11 Pro Tips
Choose Premium for long, heavy work sessions where focus is critical.
Stick to the Free version for casual, everyday bookmarking.
Key Idea to Remember: The Ad-Free Experience is not about adding more; it is about removing the noise so you can focus on what truly matters.
Was this article helpful?
Your feedback helps us improve the content.
Have questions?
Our dedicated team is here to help you understand the docs.
This final section explains exactly how LinkMark Premium plans and policies work. It details what usage limits actually mean, how subscriptions are handled, and where to find important legal information. Our primary goal here is absolute clarity and transparency, so you can make informed decisions about your digital workspace.
2 Usage Limits & Fair Use
Advanced computing features, especially AI tools, require significant processing power. Therefore, some Premium features have reasonable usage limits. These fair-use limits exist to:
Keep the service stable and fast for everyone.
Maintain high-quality output from the AI.
Ensure fair access so the network is never overloaded.
These limits may apply daily or monthly and can differ slightly based on your specific plan. However, do not worry; most users will never reach these limits during normal, daily professional use.
3 Subscription Plans
LinkMark Premium is highly flexible and available through different plans to suit your needs. Common plans include:
The Monthly Plan: Great for short-term, project-based work.
The Annual Plan: Offers significantly better value over time for long-term users.
Please note that exact availability and pricing may vary slightly depending on your country, local taxes, and the specific app store you use.
4 Managing or Canceling Your Subscription
You are always in complete control. You can manage your subscription at any time without any long-term commitment. This includes upgrading, downgrading, or canceling the service.
For maximum security, all subscription management and payments are handled securely through the Apple App Store or Google Play Store.
5 Legal and Policies
For full details regarding your data and rights, please review our official legal documents inside the app or on our website:
No, absolutely not. If you cancel Premium, your account simply reverts to the free version. Your saved links and folders remain perfectly safe and available.
8 Where can I see exact pricing details?
Because prices adjust to local currencies, the exact pricing is displayed inside the LinkMark upgrade screen and your device’s app store.
9 Who controls payments and refunds?
Since all purchases are made through your device, payments and refunds are handled directly and securely by the Apple App Store or Google Play Store.
Key Idea to Remember: Upgrading to Premium is safe, flexible, and completely optional. You control your plan, your data, and your money.
Was this article helpful?
Your feedback helps us improve the content.
Have questions?
Our dedicated team is here to help you understand the docs.
Welcome to Chapter 6 of the LinkMark documentation! This chapter explains how to fully customize your workspace using the LinkMark settings and preferences.
While LinkMark works beautifully out of the box, the Settings section gives you the ultimate power to control exactly how the app looks, behaves, and supports your unique daily workflow. Most importantly, changes you make here sync automatically across your Web, Mobile, and Desktop apps. This keeps your experience perfectly consistent wherever you use LinkMark.
2 What You Will Learn in This Chapter
3 Account and Security Management
The chapter begins by explaining how to manage your core account information. You will see how to easily update profile details, review your current account status (Free or Premium), and control essential security options.
4 2. Global Organization (Folders & Tags)
You will learn how to manage all your folders and tags directly from the Settings menu. These options help you control how your links are organized and displayed globally. You can rename, merge, or delete structures without accidentally changing your saved content.
5 Link Behavior and Display
This section covers your primary link preferences. You will learn how links open (e.g., inside the app or in an external browser), how content previews work, and how the Advanced Premium Search can be enabled or disabled. (Note: Specific browser extension-only settings are explained separately when needed).
6 Notifications and AI Settings
Next, you will find detailed explanations about notifications and smart AI settings. These sections explain how to control email or push alerts, monitor your daily AI usage limits, and toggle AI features on or off. Remember, all AI features remain strictly optional and work only when you enable them.
7 General App Settings (Accessibility)
Finally, the chapter covers General App Settings. This includes changing the app language, switching the Display Mode (Light/Dark themes), adjusting font sizes for better readability, and managing browser extensions. These settings help you create a comfortable, distraction-free experience.
8 Your Goal by the End of This Chapter
By the end of this chapter, you will know exactly how to adjust LinkMark settings and preferences to perfectly fit your habits. You will be able to customize the app for maximum productivity without adding unnecessary complexity or losing control.
Was this article helpful?
Your feedback helps us improve the content.
Have questions?
Our dedicated team is here to help you understand the docs.
The LinkMark settings overview is your gateway to full customization. LinkMark settings help you control exactly how the app looks, works, and feels—all without making things unnecessarily complicated.
The biggest advantage is that most settings are instantly shared across all platforms (Web, Mobile, and Desktop apps). Once you change a setting on your phone, it applies directly to your account and works exactly the same on your computer. This automatic syncing ensures your user experience stays perfectly consistent everywhere you go.
2 What You Can Control from Settings
LinkMark does not hide settings behind complex menus. Everything is straightforward. From the main Settings page, you can fully control:
3 Account and Interface
Manage your account information: Update emails, passwords, and subscription status.
Change Language and Display Mode: Switch between Light and Dark themes, and adjust text size for better readability.
4 Content Organization and Behavior
Control Links, Folders, and Tags: Rename, merge, or delete organizational structures.
Adjust Link Display Options: Decide how links open and how content previews behave.
5 Tools and Communication
Enable or Disable AI Features: Toggle AI tools on or off depending on your preference.
Customize Notifications: Choose how and when LinkMark communicates with you.
Access Legal and Support Links: Quickly find privacy policies, terms of service, and contact forms.
Importantly, all these options are designed to be optional. You only change what actually matters to your workflow.
6 A Note About Browser Extension Settings
While most settings work identically across all platforms, there is one small exception. The LinkMark browser extension includes a few extra, specialized settings related strictly to browser behavior and quick saving (e.g., keyboard shortcuts).
These extension-only options will be explained separately in the browser extension documentation section. Therefore, you do not need to worry about them here in the core app settings.
Key Idea to Remember: The ultimate goal of LinkMark settings is simple: to give you maximum control over your workspace, without adding any frustrating complexity.
Was this article helpful?
Your feedback helps us improve the content.
Have questions?
Our dedicated team is here to help you understand the docs.
The account information in LinkMark section lets you manage your complete digital identity and personal details in one secure place. Because LinkMark values a seamless experience, these settings are perfectly unified. Any update you make here is instantly synced across your Web, Mobile, and Desktop apps.
2 What You Can Edit Here
Your account profile is divided into clear sections, allowing you to personalize your workspace and improve how the app serves you.
3 Core Profile Details
This section controls how you appear inside the app:
Name: Update your display name at any time.
Profile Picture: Upload a new avatar to make your account feel personal.
Email Address: View the primary email used for your login and notifications.
4 Contact and Personal Info
Adding more context helps LinkMark tailor the experience to your needs:
Phone Number: Add or update your phone number for account security.
Country: Select your location to ensure accurate pricing and localized features.
Gender: Update your personal demographics.
Interests: Pick your professional or personal interests. This helps LinkMark’s algorithms improve future recommendations and workflow suggestions specifically for you.
5 Account Overview and Membership
Inside the “My Account” screen, you get a quick snapshot of your history with the app. You can easily:
See the exact date you joined LinkMark.
Access and review your Premium Membership details (if active), including renewal dates.
Log out securely from your current device.
6 Security and Account Control
LinkMark gives you complete ownership over your data. You can log out anytime from this screen to secure your session.
Furthermore, if you ever decide to leave the platform, you can delete your account permanently directly from the settings.
Warning: This critical action instantly removes all your saved links, folders, and personal data from our servers. Account deletion is permanent and cannot be undone, so please use this option carefully.
Key Idea to Remember: Your account information in LinkMark is your master key. Every change you make here applies instantly everywhere you use the app, ensuring your data is always up to date.
Account information in LinkMark
Was this article helpful?
Your feedback helps us improve the content.
Have questions?
Our dedicated team is here to help you understand the docs.
The folders and tags settings section is where you control the core organization of your LinkMark workspace. These powerful settings help you directly manage how folders and tags are displayed and maintained inside the app. By customizing these options, you effectively control how you see, filter, and organize your saved links on a daily basis.
2 Managing Your Structure (Folders & Tags)
Instead of editing individual links one by one, the Settings page gives you a global view of your entire organization system.
3 Managing Folders (The Foundation)
Folders help you group related links into clear, distinct categories (like “Work,” “Recipes,” or “Inspiration”). From the Folders settings section, you can:
View a complete list of all your existing folders.
Create new folders to prepare for upcoming projects.
Rename folders if your priorities change.
Delete unused folders to keep your workspace clean.
4 Managing Tags (The Flexible Layer)
Tags make it incredibly easy to filter and find links across different folders. From the Tags settings section, you can:
View all the tags you have ever created.
Add new master tags to your system.
Edit or remove existing tags to fix typos or remove duplicates.
5 Customizing Display Options
LinkMark respects your personal visual preference. You can choose exactly how much information appears on your Link Cards using the following display toggles:
6 Show Folders Under Links
When enabled, the specific folder name appears directly under each link title. This helps you quickly see exactly where a link belongs without opening its details.
7 Show Tags Under Links
When enabled, all assigned tags appear directly on the link card. This is highly useful for quick scanning and understanding the context of the link at a glance.
You can turn these options on or off depending on your preference. Turn them on for a detailed, information-rich view, or turn them off for a clean, minimalist interface.
8 Key Idea and Cross-Platform Syncing
The golden rule of LinkMark organization is simple: Folders organize your links structurally, while Tags add flexible labels across those folders. Importantly, any changes you make in the folders and tags settings are saved to your account instantly. They sync automatically across your Web, Mobile, and Desktop apps, ensuring your structure is always perfectly consistent.
Folders and tags settings
Was this article helpful?
Your feedback helps us improve the content.
Have questions?
Our dedicated team is here to help you understand the docs.
The link settings in LinkMark control exactly how your saved links behave, look, and open across the entire platform. Most settings here work identically on the Web, Mobile, and Desktop apps. However, because desktop browsers operate differently, a few extra options are available exclusively in the LinkMark browser extension. These settings do not affect how your links are saved; they only affect how they are displayed and interacted with.
2 General Link Settings (All Platforms)
3 Premium Search
This toggle enables the advanced Premium Search provider inside LinkMark. It allows for much more powerful web searching, including specific filters for Images, Videos, News, or general web pages. Premium Search is optional and completely separate from your saved-links search. While the basic web search is always available for free, Premium Search dramatically improves your content discovery experience.
4 Show Link Type
When enabled, LinkMark displays a small label identifying the “link type” directly on each Link Card (e.g., Website, Social Media, Video, App). This helpful visual cue allows you to recognize content types instantly while rapidly browsing your list.
5 Show Links Content (Previews)
This setting controls whether rich link previews are displayed on your cards. When enabled, LinkMark attempts to show extra embedded content or live previews (when supported by the website). When disabled, your links appear in a much cleaner, text-focused layout.
6 Extension-Only Settings (Browser Specific)
The following settings are available only inside the browser extension to help manage your active browsing flow.
7 Import Bookmarks
This powerful option allows you to instantly import your existing browser bookmarks directly into LinkMark. It is incredibly helpful when you are transitioning from traditional, cluttered browser bookmarks to LinkMark’s modern workspace. Once imported, these bookmarks become normal LinkMark links that you can freely organize, tag, and edit.
8 Open Link In
This setting controls how clicked links actually open from the extension. You can choose to open links in a New Tab (highly recommended for multitasking) or match other browser-supported behaviors. This ensures LinkMark adapts perfectly to your personal browsing style.
Key Idea to Remember: Link settings in LinkMark give you absolute control over link behavior, not just storage. Simple defaults work perfectly for everyone, but advanced options are there when you need more power.
Link settings in LinkMark
Was this article helpful?
Your feedback helps us improve the content.
Have questions?
Our dedicated team is here to help you understand the docs.
The notifications in LinkMark settings section lets you securely control exactly how and when the app communicates with you. We know that modern digital workspaces are incredibly noisy. Therefore, LinkMark notifications are fundamentally designed to be helpful, strictly relevant, and never distracting. You are always in the driver’s seat when it comes to your attention.
2 Link Suggestion Notifications (Premium Feature)
One of the most powerful alert features is the smart Link Suggestion Notification. When enabled, LinkMark may occasionally send you highly relevant suggestions based on your currently saved content.
For example, if you save many links about web design, LinkMark might suggest a trending new design tool. These smart notifications help you discover related, useful links without actively searching for them.
Note: This advanced discovery feature is available exclusively with LinkMark Premium. You can easily turn this on or off at any time depending on whether you want active suggestions or a completely silent experience.
3 Managing Notifications (Total Control)
LinkMark gives you absolute, 100% control over your alerts. We respect your focus and have a strict “no spam” policy. No unnecessary promotional or spam notifications are ever sent to your devices.
Furthermore, notifications are completely optional. If you prefer a quieter experience for deep work, you can disable them entirely from this settings page.
4 Platform Consistency and Browser Rules
Notification behavior is seamlessly unified across the Web, Mobile, and Desktop apps. If you change your preference on your phone, your desktop app will respect the new setting instantly.
However, please note that the LinkMark browser extension may specifically follow your browser’s own native notification rules (like Chrome or Safari settings). If you want to block browser alerts, you may need to adjust your browser preferences as well.
Key Idea to Remember: Notifications in LinkMark are meant to support your workflow, not interrupt it. If you want zero distractions, you can simply turn them all off with a single click.
Was this article helpful?
Your feedback helps us improve the content.
Have questions?
Our dedicated team is here to help you understand the docs.
The AI settings and usage in LinkMark section gives you granular control over how artificial intelligence features interact with your workspace. These settings allow you to decide exactly when to use AI assistance and how often, ensuring the tools fit your personal needs without overwhelming your daily workflow.
2 Enable or Disable AI Features
LinkMark believes in user autonomy. You retain the absolute power to enable or disable AI features at any specific moment.
When AI is enabled: You unlock the full set of smart tools, including Rewrite with AI for clearer titles and Summarize with AI for quick insights.
When AI is disabled: LinkMark works as a classic, high-performance bookmark manager, without any AI involvement.
This toggle gives you full control over your experience. If you prefer a manual workflow, simply turn the AI off.
3 Understanding Daily AI Usage Limits
To provide a premium experience, AI features may have specific daily usage limits. We implement these safeguards to:
Keep the service stable and responsive for everyone.
Maintain high-quality output for every request.
Ensure fair access for every single user in our community.
Your usage counter resets automatically every 24 hours based on your specific subscription plan.
4 Viewing and Tracking Your Usage
Transparency is key. From the AI settings panel, you can easily:
See a clear progress bar showing exactly how much AI usage you have remaining for the current day.
Understand when limits apply so you can plan your heavy research sessions.
Monitor your consumption to decide if you need to upgrade your plan.
Most importantly, if you reach your limit, you can continue using all non-AI features (saving, organizing, tagging) without any interruption. LinkMark never applies AI limits to your saved links or data.
Key Idea to Remember: AI is a resource, not a requirement. Use it when it adds real value, and rest assured that your core LinkMark experience never stops.
Was this article helpful?
Your feedback helps us improve the content.
Have questions?
Our dedicated team is here to help you understand the docs.
The General App Settings in LinkMark are the final piece of the customization puzzle. They allow you to fine-tune exactly how the app looks, feels, and behaves across all platforms. While most of these visual settings are shared instantly across Web, Mobile, and Desktop, some powerful productivity options are available exclusively in the browser extension to speed up your workflow.
2 Interface Customization (All Platforms)
LinkMark is designed to be comfortable for everyone. You can adjust the following global settings:
3 Language
You can choose the primary language used across the entire app interface. Changing the language instantly updates all menus, buttons, labels, and system text to your preferred dialect.
4 Display Mode (Theme)
Control the visual atmosphere of the app to match your environment:
Default: Follows your system settings automatically.
Light Mode: A clean, bright look for daytime use.
Dark Mode: A sleek, dark interface that reduces eye strain during long night sessions.
5 Font Size
Accessibility matters. You can adjust the font size to significantly improve readability. Choose a larger text size for easier reading or a smaller size for a more compact, data-dense layout.
6 Extension-Only Power Tools
If you use the LinkMark browser extension, you unlock extra controls designed specifically for high-speed web browsing.
7 Floating Icon
You can enable or disable the Floating LinkMark Icon directly on web pages. When enabled, a small, draggable icon appears unobtrusively on the screen. This allows you to “quick save” links instantly without ever needing to open the extension menu manually.
8 Keyboard Shortcuts
For maximum efficiency, LinkMark supports customizable keyboard shortcuts in the browser extension:
Open Side Panel: Quickly toggle the LinkMark sidebar.
Save Current Page: Instantly save the active tab. You can customize these shortcuts to perfectly match your existing muscle memory.
9 About & Support
Finally, the General Settings section is your hub for help. From here, you can access the official LinkMark website, find direct contact and support options, and review important app version information.
Key Idea to Remember: General settings help you make the app your own. Whether you need larger text, a dark theme, or fast keyboard shortcuts, LinkMark adapts to you, not the other way around.
General App Settings in LinkMark
Was this article helpful?
Your feedback helps us improve the content.
Have questions?
Our dedicated team is here to help you understand the docs.
Welcome to Chapter 7 of the LinkMark documentation! Modern life is multi-device. You might start your day reading news on your phone, do deep research on your laptop at work, and organize your projects on a desktop at home.
This chapter explains exactly how to master using LinkMark across platforms. It shows how each specific version of the app supports a different, optimized way of saving, reviewing, and managing your links. By understanding the ecosystem, you ensure your content is always right where you need it.
1 What You Will Learn in This Chapter
2 Platform Superpowers
We will break down the unique strengths of each platform so you know exactly which tool to use for the job:
The Web App: Serves as your central command center. It focuses on clear viewing, deep organization, and managing complex folders on a large screen.
The Mobile App: Is your ultimate “capture tool.” It helps you save links quickly on the go via the native Share Sheet, ensuring you never lose an idea while commuting.
The Desktop App: Offers a calm, focused, and distraction-free workspace separate from your chaotic browser tabs.
The Browser Extension: Acts as the bridge to the web. It lets you save links instantly with one click while actively browsing.
3 Seamless Syncing
You will also learn how our robust syncing engine works in the background. LinkMark automatically keeps your links, folders, tags, and settings perfectly connected under one account. Consequently, you do not need to manage syncing manually or worry about version conflicts.
4 Context-Aware Productivity
This chapter helps you choose the right platform for each specific task. You will learn the best workflow: saving links anywhere (like Mobile or Extension) and reviewing them later on a more comfortable device (like Desktop or Web).
5 Your Goal by the End of This Chapter
By the end of this chapter, you will know how to use LinkMark smoothly across all supported platforms. You will be able to switch devices freely and continue working without interruption, knowing your content stays consistent, clear, and always available.
Was this article helpful?
Your feedback helps us improve the content.
Have questions?
Our dedicated team is here to help you understand the docs.
The LinkMark Web App serves as the central command center for your entire digital library. It is the primary place to view, review, and deeply manage your saved links on a much larger screen.
Unlike mobile apps which are built for speed, the Web App is specifically designed for clarity, better focus, and comfortable, large-scale organization. You use the Web App when you want to stop collecting and start processing—going through many links calmly, reading AI summaries clearly, and organizing your projects without rushing.
2 What You Can Manage from the Web App
The Web App offers the most complete set of tools. From this interface, you can effortlessly:
View Your Entire Library: See all your saved links in a spacious, easy-to-scan layout.
Edit and Refine: Edit titles, update descriptions, and fix metadata with precision using your keyboard.
Leverage AI Power: Use Rewrite with AI and Summarize with AI features more comfortably on a big screen to process heavy articles.
Deep Organization: Assign folders, add multiple tags, and pin important favorites instantly.
Cleanup: Archive old resources or delete unwanted links in bulk to keep your workspace fresh.
Search: Use the powerful internal search or the Premium Web Search (if enabled) to find exactly what you need.
Remember, everything you do here is synced automatically and instantly with your mobile and desktop apps.
3 Common Use Cases (Deep Work)
The Web App is the ideal platform when:
You are sitting at your desk working or studying on a laptop.
You need to review a long list of saved articles for a research paper.
You want to perform a “weekly review” to clean up old links.
You are organizing a large project that requires creating many new folders and tags. It is, without a doubt, the best option for deep review and structural organization.
4 When to Choose Web Over Mobile?
While the mobile app is perfect for quick capture, you should choose the LinkMark Web App when:
You need screen real estate: Viewing complex information is easier on a monitor.
You want better readability: Reading long summaries is less tiring for your eyes.
You prefer keyboard efficiency: Using a mouse and keyboard allows for faster editing and multitasking.
You are not in a hurry: You have the time to sit down and truly focus on your content.
Key Idea to Remember: Think of the Web App as your library’s headquarters. It is where you go to organize the chaos and turn saved links into structured knowledge.
Was this article helpful?
Your feedback helps us improve the content.
Have questions?
Our dedicated team is here to help you understand the docs.
The LinkMark Mobile App is your essential pocket tool, built specifically for fast saving and quick access on your smartphone. In a world where we consume information constantly on the go, this app helps you capture valuable links the exact moment you find them—especially from social media feeds like Twitter, LinkedIn, or Instagram. Use the mobile app when you prioritize speed, flexibility, and instant capture over deep organization.
2 How to Download and Install
Getting started is easy. You can install LinkMark on both Android and iOS devices in seconds:
Important: After installation, simply sign in with your account to instantly sync all your existing links and folders across your devices.
5 What You Can Manage from the Mobile App
The mobile interface is streamlined for action. From the app, you can:
Instant Capture via Share Sheet: This is the most powerful mobile feature. Save links from any other app (like Chrome, YouTube, or Reddit) by tapping “Share” and selecting LinkMark.
Browse Anytime: Scroll through your saved links while commuting or waiting in line.
Smart Review: View Link Cards and read AI-generated summaries without opening the full browser.
Quick Actions: Favorite, pin, archive, or delete links with simple swipe gestures.
Search on the Go: Use the internal search or Premium Web Search (if enabled) to find information instantly.
6 Common Use Cases (The “Capture” Moment)
The LinkMark Mobile App shines when:
You are scrolling through social media and find an interesting thread you don’t have time to read now.
You are away from your computer but need to look up a saved resource.
You want to “micro-organize” your list in short 5-minute sessions.
You need to quickly save a recipe, a video, or a news article for later.
It is designed for quick, decisive actions, not for heavy-duty folder restructuring.
7 When to Choose Mobile Over Web?
You should choose the Mobile App when:
You are using your phone: It is the native, fastest way to interact.
You need speed: Saving a link takes less than two taps.
You want access anywhere: Your entire library is in your pocket.
You don’t need a large screen: Quick reading and saving don’t require a monitor.
(Note: For deeper organization, bulk editing, and long reviews, the Web or Desktop App is a better choice).
Key Idea to Remember: The Mobile App is your “Capture Tool.” Use it to grab ideas instantly, and leave the heavy organization for when you are back at your desk.
Was this article helpful?
Your feedback helps us improve the content.
Have questions?
Our dedicated team is here to help you understand the docs.
The LinkMark Desktop App is specifically designed for focused work and daily review. Unlike the web browser, which is often chaotic and filled with open tabs, the Desktop App gives you a clean, calm, and dedicated workspace.
It allows you to separate your “knowledge base” from your “browsing activity.” Use the Desktop App when you want to shut out the noise of the internet and simply stay focused while working with your saved links.
2 How to Get the Desktop App (macOS)
The LinkMark Desktop App is currently available and optimized for macOS. Installing it is simple and secure directly from the Apple ecosystem:
Click Get or the download icon to install the app.
Once installed, launch the app and sign in to your account.
As soon as you log in, your entire library of links, folders, and tags will sync automatically to your Mac.
3 What You Can Manage from the Desktop App
The Desktop App provides the same powerful core experience as the Web App but is optimized for speed and native interaction. From this sleek interface, you can:
Browse Distraction-Free: View your saved links in a layout designed for reading, not browsing.
Read with Focus: Open content previews or read AI summaries without opening a new browser tab.
Use AI Power: Instantly Rewrite titles or Summarize articles using the integrated AI tools.
Organize Quickly: Favorite, pin, archive, or delete links using familiar keyboard shortcuts.
Search Instantly: Find any saved content across your library in milliseconds.
4 Common Use Cases (Daily Routine)
The LinkMark Desktop App is the perfect choice when:
You work on a Mac for long periods and want a dedicated app always open in the background.
You perform a “daily review” of your reading list each morning.
You prefer the stability and speed of a native app over a browser tab.
You want a quieter work environment where notifications and browser clutter don’t exist.
5 When to Choose Desktop Over Other Platforms?
You should choose the Desktop App when:
You value focus: You need a space specifically for knowledge management.
You want simplicity: The interface is cleaner than the full web dashboard.
You don’t want to rely on a browser: Keep your research separate from your surfing.
(Note: For instant, one-click saving while surfing, the Browser Extension is faster. For heavy bulk organization, the Web App offers slightly more flexibility).
Key Idea to Remember: The Desktop App is your private study. It is where you go to read, think, and process information without the distractions of the open web.
Was this article helpful?
Your feedback helps us improve the content.
Have questions?
Our dedicated team is here to help you understand the docs.
The LinkMark Browser Extension is the ultimate bridge between discovering content and saving it. Built specifically for speed, it allows you to capture ideas instantly while actively browsing without ever leaving the page you are on.
It is designed to be invisible when you don’t need it and instantly available when you do, ensuring your reading flow is never interrupted.
2 How to Install the Extension
Currently, the extension is optimized for Google Chrome and Chromium-based browsers (like Edge or Brave).
Once installed, click the extension icon and sign in to your account.
Tip: Pin the extension icon to your browser toolbar for faster one-click access.
3 What You Can Do (Power Features)
The extension is more than just a “save button.” It is a mini-version of the app living inside your browser:
One-Click Save: Instantly save the current tab to your library.
Side Panel Access: Open a sleek side panel to browse, search, or edit your links alongside your open webpage.
Keyboard Shortcuts: Use custom hotkeys to save or open LinkMark without touching your mouse.
Quick Organize: Favorite, pin, or archive links immediately after saving them.
4 Importing Browser Bookmarks (Exclusive Feature)
This is the most critical feature for new users. The LinkMark Browser Extension is the only place where you can import your existing, messy browser bookmarks into LinkMark.
This powerful tool helps you migrate from traditional, static bookmarks to a modern, AI-powered workspace. With the import tool, you can:
Bulk Import: Bring thousands of saved bookmarks into LinkMark in seconds.
Convert to Cards: Turn old text links into rich Link Cards.
Sync Everywhere: Once imported, these old bookmarks become available on your mobile and web app instantly.
5 Common Use Cases (Active Browsing)
The browser extension is your best friend when:
You are in “Research Mode,” opening dozens of tabs that need to be saved quickly.
You want to check if you already saved a link without opening a new tab.
You hate interrupting your workflow to switch apps.
You want to consolidate years of old bookmarks into one clean system.
6 When to Choose the Extension Over Other Platforms?
You should choose the Browser Extension when:
Speed is your priority: You want the absolute fastest way to save.
You are actively browsing: You are already inside Chrome or Edge.
You need quick access: You want to peek at your library via the Side Panel.
(Note: For deep folder management or bulk deleting, switch to the full Web App. For saving from Twitter or Instagram apps, use the Mobile App).
Key Idea to Remember: The Browser Extension keeps you in the flow. Save what you need, organize it later, and never stop browsing.
Was this article helpful?
Your feedback helps us improve the content.
Have questions?
Our dedicated team is here to help you understand the docs.
Syncing between platforms in LinkMark is the invisible engine that powers your entire experience. It ensures that your saved links, folders, and personal settings remain exactly the same across every device you own.
When you sign in to LinkMark on your phone, laptop, or tablet using the same account, everything stays perfectly connected. You never have to worry about manually transferring data or losing a link you saved earlier.
2 What Syncs Automatically?
Our synchronization engine is comprehensive. When sync is active, LinkMark automatically keeps the following elements updated in real-time:
Saved Links & Link Cards: Every URL, title, description, and thumbnail.
Organization Structure: All your Folders and Tags.
Status: Your Favorites, Pinned items, and Archived history.
AI Data: Any rewrites or summaries you generated.
Personal Preferences: Your account settings, including Language and Dark/Light display modes.
Essentially, any change you make on one platform instantly mirrors on all others.
3 How Syncing Works (The Magic)
You do not need to be a technical expert to use syncing. It works quietly in the background:
Sign In: Simply log in to the same LinkMark account on all your devices.
Make a Change: Save a link on mobile, or rename a folder on the web.
Auto-Update: LinkMark’s cloud server detects the change and pushes it to your other devices instantly.
There is no “Save” button to press and no manual refresh needed.
4 When is Syncing Useful? (Real Life Scenarios)
Syncing transforms how you work throughout the day:
The Commute: You find an interesting article on Twitter while on the bus and save it to LinkMark on your phone.
The Work Desk: When you arrive at the office and open the Web App, that article is already there, waiting for you to read on the big screen.
** The Couch:** Later at home, you open your iPad (iOS app) to organize the link into a folder. Your workspace stays consistent, fluid, and always available, no matter where you are physically.
5 Important Notes and Requirements
Internet Connection: Real-time syncing requires an active internet connection. Offline changes will sync as soon as you reconnect.
Account Consistency: You must be signed in to the same email address on all devices.
Guest Mode: If you use the app as a “Guest” without signing in, your data is local to that device and will not sync.
Key Idea to Remember: You don’t have to think about syncing. Use LinkMark on any platform you like, and trust that your content is already there waiting for you.
Was this article helpful?
Your feedback helps us improve the content.
Have questions?
Our dedicated team is here to help you understand the docs.
Welcome to Chapter 8, the final chapter of the LinkMark user guide. Even the most stable applications can encounter occasional hiccups. This chapter specifically explains how to find LinkMark help and support when something does not work exactly as expected.
Our goal is to show you where to start looking and how to fix common issues quickly on your own. We want to ensure that getting help is simple, stress-free, and keeps you in control of your workflow.
2 What You Will Learn in This Chapter
3 Basic Troubleshooting (First Steps)
Before spending time writing an email, you will learn exactly what to check first. Simple steps—like verifying your internet connection, ensuring you are signed in to the correct account, or simply updating the app—solve the vast majority of technical issues. These quick self-checks save you time and help you get back to work much faster.
4 Finding Help Inside the App
You will see how to use the app’s internal tools to solve mysteries on your own.
Settings: How to reset preferences.
Search: How to find “missing” links that might just be hidden.
Archive: How to check if a link was accidentally archived instead of deleted.
5 Contacting the Support Team
If you still need assistance after trying the basics, this chapter explains exactly how to contact the support team. You will learn the different ways to reach us across the Web, Mobile, Desktop, and Browser Extension.
It is important to know that all requests go to the same unified support team, no matter which platform you use. This ensures your issue is tracked and resolved efficiently.
6 Your Goal by the End of This Chapter
By the end of this chapter, you will know exactly where to look and what to do if you need LinkMark help and support. You will feel confident troubleshooting minor issues yourself and know exactly how to reach a human expert when you need one.
Was this article helpful?
Your feedback helps us improve the content.
Have questions?
Our dedicated team is here to help you understand the docs.
Getting help in LinkMark is designed to be a fast, self-service experience. We know that encountering a technical glitch can be frustrating. However, the good news is that most common issues are temporary and can be solved in a few quick steps on your own.
Before waiting for a reply from support, please start with the 5-step basic check below. It resolves about 90% of reported problems.
2 Step 1: Check Your Internet Connection
LinkMark relies on the cloud. Some key features require a stable internet connection to function correctly, such as:
Real-time Sync across devices.
Web Search (Basic and Premium).
AI Tools (Summarize and Rewrite).
Fix: If the app feels “stuck,” try switching between Wi-Fi and mobile data to see if the connection is the culprit.
3 Step 2: Verify You Are Signed In
LinkMark sync and account-based features work only when you are actively signed in. Sometimes, a session might expire silently for security reasons.
Fix: Open Settings and check that your account status says “Active.” If in doubt, sign out and sign in again to refresh your session token.
4 Step 3: Refresh or Restart the App
It sounds like a cliché, but it works. If the interface looks frozen or a button isn’t responding:
On Mobile: Force close the app completely and open it again.
On Web: Simply refresh the browser page. This clears the temporary cache and reloads the data.
5 Step 4: Update to the Latest Version
Software moves fast. If you are facing a bug, chances are we have already fixed it in a recent update.
On Mobile: Check the App Store or Google Play Store.
On Mac: Check the Mac App Store.
On Chrome: Ensure your browser extension is updated from the Chrome Web Store.
6 Step 5: Check Feature Availability
Sometimes a “bug” is actually just a setting or limitation.
AI Missing? Check if you have disabled AI in settings or reached your daily limit.
Preview Blank? Some websites block external previews; this is normal behavior for secure sites.
7 Where to Find Help Inside LinkMark
You have powerful debugging tools right inside the app:
Search: Use it to locate “lost” links that might just be buried in a folder.
Archive: Check here if you accidentally swiped a link away.
Settings: Use this to reset your preferences or check your notifications.
8 Common Questions (FAQ)
9 Do I need to be signed in to get help?
No. You can read this documentation or contact support without signing in. However, fixing sync issues requires you to be logged in.
10 Where should I start if something is not working?
Start with Step 1 and 2. Checking your internet connection and sign-in status resolves the vast majority of user reports.
Key Idea to Remember: Most problems are small connectivity or login hiccups. A quick restart or update usually gets you back to work instantly.
Was this article helpful?
Your feedback helps us improve the content.
Have questions?
Our dedicated team is here to help you understand the docs.
If you encounter a problem that you simply cannot resolve on your own, do not worry. You can easily contact the LinkMark support team directly. Our dedicated support staff is available to help you with:
General questions about how to use the app.
Technical or feature-related issues.
Troubleshooting sync or account connection problems.
It is important to remember that all support requests go to the same unified team, regardless of which platform (Web, Mobile, or Desktop) you are using.
2 When Should You Contact Support?
Before writing to us, we recommend checking the “Getting Help” section first. However, you should definitely contact support if:
A core feature is consistently not working as expected.
Sync remains broken even after trying the basic troubleshooting checks.
You have a specific question about your account status.
You need clarification on a feature that isn’t explained in the docs.
3 How to Contact Support (3 Ways)
We have made reaching out as easy as possible. You can contact LinkMark support using any of the following methods:
4 From the App Header (Quickest Method)
On supported platforms (like Web and Desktop), you can reach support directly from the main interface:
Look for the Message/Support icon in the top header.
Click the icon to open the chat widget.
Write your message and hit send. This is useful when you need help without breaking your workflow.
5 From Settings (Universal Method)
This option is available across all platforms (Web, Mobile, Desktop, and Extension):
Open the main Settings menu.
Navigate to the “Support” or “Contact Us” section.
Fill out the request form and send it.
6 From the Web App Footer
If you are browsing the Web App:
Scroll down to the very bottom of the page.
Click the “Contact Us” link in the footer.
7 How to Get a Faster Reply
To help our support team investigate and resolve your issue quickly, please try to include the following details in your message:
A short, clear description of the issue.
The specific platform you are using (e.g., “iOS App” or “Chrome Extension”).
Context: What were you trying to do when the issue happened?
Error Messages: If you see any error text or code, please copy it into the message.
8 Important Notes on Security and Privacy
Support for Everyone: High-quality support is available for all users, whether you are on the Free plan or Premium plan.
Password Security: LinkMark support will NEVER ask for your password. Please never share it with anyone.
Payments: Refund and billing questions are often handled directly by the App Store or Google Play Store, as they process the actual payments.
Final Thought: We built LinkMark to be simple and reliable. If you ever get stuck, our team is just a click away to help you get moving again.
Was this article helpful?
Your feedback helps us improve the content.
Have questions?
Our dedicated team is here to help you understand the docs.